Tuesday, March 28, 2017

How to Choose Paint Colors: Four Simple Rules

I wrote an earlier version of this post, when we renovated our very first house.  And since it's one of my most popular Pinterest posts - and we are on house #10 - I thought maybe it was time to do an update!

So how do you pick a paint color?  

Rule number 1, don't start with the paint color!  Paint comes in any shade you want, so it should be the last decision you make.  It's easy to find a color  to match!  First you need to think about other colors in the rooms.  Do you have a piece of artwork or fabric that is your color inspiration?   Or maybe a pillow, with your favorite colors? 

For example, on this house, I was inspired by Acadia National Park.  Their 100th birthday was last year and people from all over the country came to celebrate its beauty.  It was an all-things-Acadia year here in Maine.  And as soon as I saw this poster, I knew it was perfect for the house.  

That provided a color inspiration for the house.  My initial thought was to use sea glass colors - but this confirmed it!  


Next, I saw this giant canvas at HomeGoods.  It didn't have a price tag and when I asked the clerk how much - he suggested $25.  Sold!!!  I love the beach glass colors and the way they all meld together.


To build on the color scheme, I found this beautiful fabric for window treatments.  It's called Kashmira, designed by ECHO for Kravet.  The watery blue is perfect and finalizes our color palette.  
 

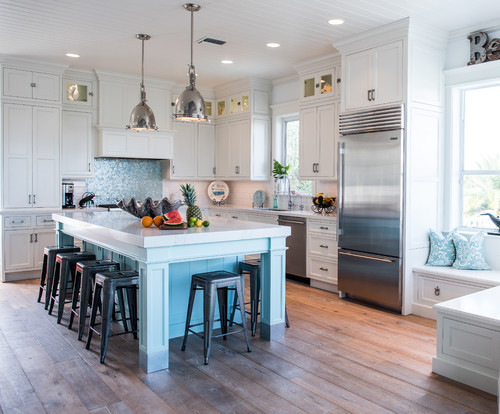
Rule number 2 - a cohesive color palette will make a home look and feel bigger, which is essential when you have an open floor plan like ours.  So you need to think about the entire space.  The fun thing is, when you start to pull it together, it gets easier, not harder.  As I layered the fabric, cabinet colors, artwork and tile, it starts to create a cohesive whole. 

But that doesn't mean everything needs to match.  Look at your rugs and fabrics and see if there is a unifying color that will tie them all together and provide a nice background.  In our case, since we will be putting this house up for sale, the majority of the space needs to be a neutral that will appeal to a lot of buyers. So I want the majority of the walls to be white.  But for your own house, go with what you love.  The all white look appears to be falling from fashion - color is in again!

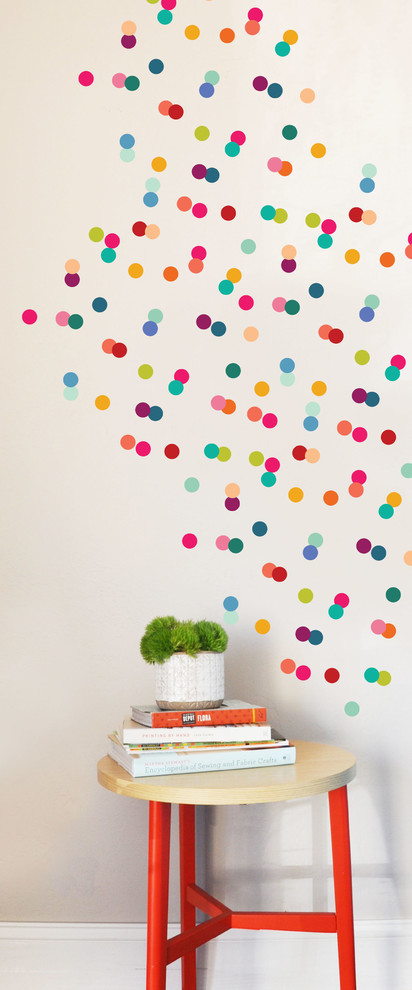
Rule number 3 - Think about other elements in the room.  For example, our kitchen will have lots of white in the cabinets.  So we don't want it to be too pale, we want to provide a nice contrast.  I'll do that with a punch of color on the island.   Is your furniture dark?  You might want a light color palette, to make it stand out.  

With all those things determined, I armed myself with my color fans and started looking at options.  I came up with some ideas - but that brings me to rule number 4 - buy paint samples and put them on the wall.  I've ignored this too many times, and it's caused a lot of grief.   Why?  Because that requires me to convince my color blind husband that we need to repaint - he doesn't get it when that tiny chip of paint looks different in a whole room!  That taught me a lesson and now I always sample first.  And it's also helpful to see how the colors look during different times of the day - sunlight or cloudy days can dramatically change the look!
Sherwin Williams Blithe Blue, Tidewater and Snowbound


So, here's what I'm coming up with for this project.  I want it to be a light, bright beach cottage.  So white walls are a must.  But white can be tricky.  I gave some thought to Sherwin Williams Extra White (that's the primer color that you see all over the house), but I decided that might be a bit too stark.  Instead, we'll go with a slightly warmer shade, called Snowbound.  It's a bit hard to see, but it's to the right of the two blue samples!  It will give us a slight contrast with the moldings, but still keep the house bright.


I agonized over the shades of blue.  I really want to provide a pop of color on the island, and while I like both of these blues, at this point I'm leaning towards the middle color - SW Tidewater.  We can still tie in some of the darker shades in pillows and art.  And of course, it's already in the fabric for the window treatments.


We will also be able to integrate the colors with our feature tiles in the kitchen backsplash.  It's great when everything starts to come together!


What do you think??  Do you love the sea glass blues and greens as much as I do??
Pin It

Wednesday, March 22, 2017

Update: New Master Suite


Lots of progress around here!  We have walls and some lights and it's starting to look like a house someone could live in. So I wanted to share one of the key features of the Ugly Duckling - the new Master Suite.  It's part of the new addition, so I can't show any before photos, but the during pics are pretty exciting!  

It's accessed from the main hallway
Don't you love the new porthole window???  


Entrance to Master Suite
 - but is located a couple of steps down from the rest of the second floor, making it a private retreat for the owners.


Here's the floorpan.  It includes a big bedroom, with a large walk in closet and a master bath.

Check out the high ceilings in the bedroom, with a vaulted ceiling framed by the gambrel roofline on the front of the house. Won't that make the perfect sitting area?

The bank of windows on the far wall will frame the bed - bringing light into the room, while maintaining privacy.

And don't you love the water views from the back window?  It's the perfect spot for a desk, so you can gaze out the window for inspiration while you work.  Or to watch the Casco Bay Ferry going by.

There is also a big, walk in closet, which will have lots of shelving and space for hanging clothes.

The master bath will be a combination of elegant features and modern conveniences.  As you see in the mood board below, we'll have a large shower - including the patterned marble feature wall.  And I'm pretty excited to see the glass 'barn-door' that we'll use across the front of the shower.

A double vanity will make the space functional for a busy couple, getting ready in the morning.  And it provides lots of storage space with drawers and cabinets.  We are featuring Watermark fixtures - made in Brooklyn, they are a beautiful accent for the room.  I love these luxurious, heavyweight fixtures!   Finally, the Pottery Barn sconces and ceiling fixture will make the whole space nice and bright.
Future Master Bath 
What do you think?  Will this be a tranquil get away for the future owners?


Pin It

Tuesday, March 14, 2017

Cabin Fever - Kid's Rooms

We've had quite a few snow days this winter.  And if I'm going to be stuck in the house, seems like I should do something useful.  So when cabin fever strikes, I whip out the sewing machine!

Kids Room 1 - high ceilings and lots of sunlight
I've been thinking about the 'kids rooms' for this house for quite awhile.  And thanks to the snow, I've had time on my hands and was able to translate those ideas into a few extra touches.


Kids Room 1 - For the middle bedroom, I'm going to use this duvet and sham set I bought at Zara Home, while we were living in Europe.  Don't you love the multi colored alphabet and the little fabric pom poms on the edges?  I love the pops of color and really wanted to include them throughout the room.
Zara Home Kids Alphabet 
Photo:  Target

With that in mind, I saw this llama at Target and just had to buy it.  Seriously, isn't he adorable?

Dots Wall Decal, Rainbow
Houzz


I'd been inspired by this photo on Houzz.  But I didn't think the future owners would appreciate me painting multi color dots all over their walls. So instead, I wanted to highlight the big, double window - and window treatments are the perfect way to do that.


And as luck would have it, I had some Pottery Barn white drapery panels on hand. They are the perfect blank canvas (literally) for an easy project.


This sponge applicator made perfect circles!

First step:  This is a really simple DIY project.  I started with a tarp on the floor, to protect from any paint soaking through.  Then, I simply used acrylic paint to create the dots.  At 99 cents a bottle, this was an inexpensive project.


The sponge applicator made perfect circles..... although a few needed additional fill in with a small paintbrush.  Since we have so many colors from our duvet, I decided to go crazy and use 7 different colors.  But for another project, you could use any color combo you wanted!

Now that the panels are done, I can't wait to get the room finished, so I can see what they look like, hanging from a curtain rod.

Kids Room 2:  For the back bedroom, I've been dying to use this Pottery Barn Aiden pattern.  I just love the cute little buildings and cars that are printed on this duvet and sham set.  But I wanted to translate that into window treatments as well.  They don't make a drape to match, so I tried to figure out what else I could do.  I bought an extra sham and thought it would be cute to create a valance with the cute little buildings and cars on it.
Source:  Pottery Barn Kids - Aiden

My friend Faith suggested I use a product called Steam-a-Seam2, to get the look, without a lot of work..


It lets you appliqué a pattern - with no sewing!!!  Just cut it out,  iron it on and it's permanent.


In a couple of hours, I had 3 valences put together.  Pretty cool, don't you think?

Of course I'll need some art in this room, to add more pops of color.  And I splurged on this Land of Nod canvas print.  Don't you love the cross section of the ship?
Source:  Land of Nod
We have lots more to do, so I won't get to use any of these for awhile.  But they were fun to put together!


Pin It

Tuesday, March 7, 2017

Ugly Duckling - Kitchen Planning

I'm so excited about the kitchen in this house!!!  It's truly the heart of the home, located right in the center of the house - adjacent to the living room, dining room and the mudroom (very convenient for bringing groceries in from the garage!).

And it's big!  Roughly 20 x 16 feet, it has room for lots of storage, a big island, room to eat a casual meal, or just chat with the chef. And thanks to the open floor plan, it will be open to the dining room and most of the living room - but with just the right amount of screening as you come through the front door.

Of course right now, there's not much to look at!  This is the view from the mudroom.  The dining room is off to the left and the living room to the right.  Oh, and see all those wires hanging down from the ceiling?  We will have lots of recessed lighting!  Note the big steal beam going through the middle of the room.  That lets us span the large space, while maintaining some head room for tall people!
Kitchen framing, electrical and plumbing are complete

The plan has the stove and fridge on the back wall - with the sink overlooking the dining room and all the windows across the back of the house.  There is a lot of counter space, which provides room for multiple cooks.  And there are lots of cabinets,  for all your kitchen stuff!

But my favorite feature?  The giant island! And this one is really functional.  It provides cabinet space for a roll out trash & recycling center, lots of deep drawers and a microwave.  And while I love a big island, it shouldn't resemble an aircraft carrier - just a big blank horizontal space.  I want something a bit more interesting.  For this island, we will have a raised section with a butcher block wood top (with seating for 4) as well as a typical counter height section, that will provide lots of food prep space.  It's the perfect kitchen for lots of cooks and spectators!

Why do I like it so much?  Well, it's a similar layout to my own kitchen - so I know from personal experience how well the layout works!  And I love putting the microwave in the island.  It doesn't take up any counter space and it's a convenient height for loading/unloading.  We have also included a window between the countertop and the upper cabinets.  This brings lots of natural light into the workspace, without sacrificing storage space.

SoPo Cottage Kitchen with curved island - inspiration for the Ugly Duckling
Photo:  Viatera
And what about finishes for the ugly duckling kitchen?  Well, I want to keep it neutral for a future buyer.  But since we're so close to the beach, we need a few touches of watery blues and sea glass green for accents.  So I have ordered white cabinets for the perimeter of the room.  The countertops will be a white quartz, called Cirrus, which looks amazingly like Carerra marble, without all the upkeep!  And to keep the white from being too bland, the island will be blue.  That will give a nice pop of color (but the new owners could always paint it another color if they want to).  And the curved wood top will add some nice warmth to the room.

With those ideas in hand, I was browsing Houzz last week and found this kitchen!  Love it and it has a lot of the features that we will include.
Intracoastal Beach Home


For our backsplash, we'll use white subway for the majority of the space. But the space behind the stove needs to be something special!  I've been working with Meeting House Designs and we've come up with a custom glass design from Oceanside Glasstile.  They make amazing glass tile and we're creating a custom design using their ocean palette, with a combination of clear, matt and iridescent glass.  The glass finish really mimics water, perfect for a house by the beach!  But creating a custom palette turned out to be much harder than I expected.  They shipped the first color mock up - and it was, well......blah....

By keeping it neutral, it just didn't have any character.  The next sample was much better.  And by mixing those two designs, we've now ordered the final tile, which should look amazing!!  (BTW - the iridescent finish doesn't really show up well in a photo, it looks amazing in person, shimmery and watery.  Perfect beach house style!)
Oceanside Glasstile Muse Collection

Restoration Hardware 20th Century Factory Filament 


The lights over the island will be these pendants from Restoration Hardware.  The ribbed glass and Edison bulbs are perfect!  And we'll have lots of recessed lighting, as well as under cabinet lighting, to make it an easy kitchen to work in.

Photo:  Thermador


For appliances, I'll be installing a Thermador gas range - now that we have natural gas service to the house.  As well as a Thermador dishwasher.


And the final touch?  We are going to keep the exposed beams and beadboard ceiling of the original house.  This is a HUGE job.  It meant we had to very carefully run electrical, plumbing and heating lines - making the plumbers and electricians a bit crazy :-)  Not to mention extra discussions with the building inspectors, to make sure we did everything to code.  And we will be doing a lot of fancy carpentry, to dress everything up.  But the final look - will make it all worthwhile!  I love when we keep original features!

So what do you think?  Is this a kitchen you'd enjoy working in?


Pin It

Thursday, March 2, 2017

Dirty Jobs Part 2: Paint Stripping, Which Stripper Works Best?

As I mentioned in a previous post, I found a fantastic, antique mantle for the living room fireplace.  But it had so many layers of paint on it, the details of the carving had lost their clarity.  So I wanted to remove the paint and clean it up.

This had to be done in my basement, since it's the middle of winter.  So a safe paint stripper was essential. I had a bottle of the orange citrus stripper and started to use that.  But I had seen a non toxic stripper, called Paint & Urethane Stripper by Blue Bear, at the Historic Home Show and wanted to give that a try too.  That made me decide to do a side by side comparison!

Here's what I learned:

Both strippers take awhile to work - at least a few hours.  I found the best approach was to apply a heavy coat in the evening, cover it with plastic, and scrape it down the next morning.  That gave it lots of time to penetrate the many layers of paint.


The orange, citrus stripper got down to bare wood in 2 applications.  But it's messy!!!  I read one review that described the scraped off paint as boogers.....and that's the perfect description.  It comes off easily with a putty knife, but you can't get it off the knife, no matter how much you shake it.  You need to manually scrape it off.  And the pile of sticky boogers on the work table wasn't a lot of fun.  And to finish cleaning everything off, they recommend odorless mineral spirits - which I really didn't want to use in my closed up basement.

The Paint & Urethane Stripper took 3 applications to get to bare wood.  But it was much easier to work with. The old paint was easy to remove and you could clean up any extra with soap and water.  A huge improvement!  And look at some of the details, that were completely lost with the multiple layers of paint!
Top latex layers wrinkled up quickly!

Look at the detail
You couldn't even see some of those scrolls and dots before I started!
In both cases, I found a putty knife and a plastic scrubby pad to be my best tools.  I went through a lot of scrubby pads, but at least with the Blue Bear stripper, I could rinse them out with water and use them a little longer.  And since I'm planning to repaint this, I didn't have to get too crazy with dental tools, to pick out every little bit of white paint.


It's a messy project!


The result?  Well, I wasn't trying to strip this to the point that I can just stain the wood.  I just wanted to see the beautiful carved details in the original.  And I couldn't be more pleased.  Isn't this a beauty?  I can't wait to get it installed!
So what would I use next time?  Well I still prefer these environmentally friendly products.  They are a huge improvement over the nasty chemical ones.  And while the Paint & Urethane Stripper took an extra coating to get me to the bare wood, I still think I'd use that again.  The ease of use with water clean up and less sticky mess, made it a great way to get this dirty job done! 


Pin It
Related Posts Plugin for WordPress, Blogger...