I might have declared victory on the demo phase of the project a bit too soon. True, the guys have started putting in some new posts and beams, but there are still some issues that have reared their ugly head.
Full disclosure, we knew that the floor under the asbestos tile was likely to have some challenges. But the reality was far worse than we expected. When the guys peeled back the subfloor, we discovered that it wasn't just the sill (the big timber that sits on top of the foundation that has all the studs nailed to it) that was rotted, but the floor joists were in truly terrible shape.
 |
| This section of sill looked fine from the top, but when we rolled it over we found this! |
This is the mess we found with the subfloor removed. Wood rot everywhere
 |
| It smelled like compost when we pulled back the subfloor - probably because it is! |
The floor joists are 3"x10" - big, heavy joists. Which is probably a good thing, because even though they were rotted, they still held the floor up with support from only one end. We repeated our mantra yet again "How is this house still standing?"
In the main section of the kitchen, we found similar sill issues. And of course the studs above it are seriously compromised, having been cut away to install vents or simply left to rot. Again - "How is this house still standing?"
So the guys ripped everything out. It felt like a bit of an archeological expedition, as we opened up the crawl space of a very old building. What did we find? Nothing! Not a single skeleton, money or artifact! Instead we just have this odd view of the kitchen - isn't it weird to see all of the foundation and dirt floor exposed?
 |
| Such a strange view of the kitchen! |
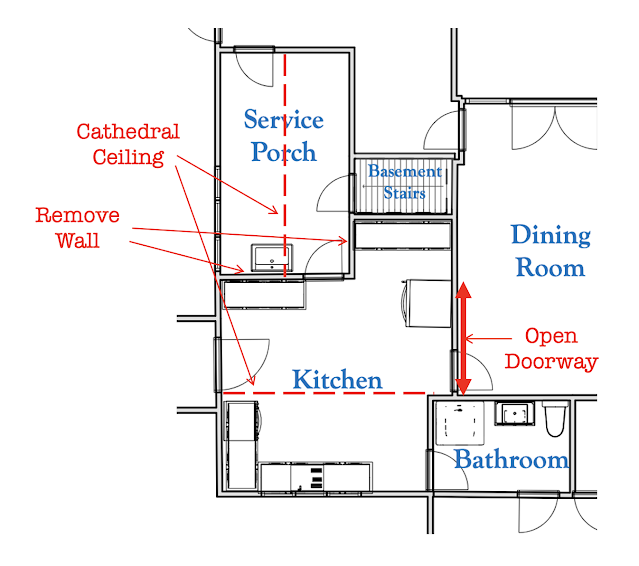
What's next you ask? How can we keep this from happening again in another 30 years? This is where building science takes over (and for those of you that don't need this detail - please skip ahead!).
 |
| The window wall is 'floating' over old foundation while the work is done |
Step 1 - try and prevent water from getting up against the foundation in the first place. We have taken several steps to keep water away from the foundation (gutters, grading, etc), but this side of the house is at the bottom of a hill and we're big fans of belt-and-suspenders mitigation, so we wanted to do more.
Step 2 - so we raised the wooden sill. Instead of putting a sill back where the old one was, we installed a course of concrete block on top of the stone foundation, to raise the wood up 8 inches. We will waterproof the block from the outside, to keep water from using the block as a sponge.
Step 3 - install a sill gasket to separate the wood sill from the new concrete (this prevents any moisture coming up through capillary action) and install a new sill of pressure treated wood. Now the wood is isolated from moisture!
 |
| This membrane will wrap all the way to the bottom of the foundation |
Step 4 - Air seal the foundation with a plastic membrane. This is critical to make the house more energy efficient. We don't want any cold coming from the outside, through cracks in the old mortar. We had a roll of roofing membrane on hand, so used that to seal up all around the exterior of the foundation.
Step 5 - Install a vapor barrier on the dirt floor. It's really important to get up any organic material before you do this step (if you skip this step, it can rot and create an odor issue later). And yes, I vacuumed all the sawdust off the dirt - as usual the guys thought I was crazy. This prevents any moisture from coming up from the ground. The edges of the vapor barrier are sealed to the air barrier with a can of spray foam, to hold it in place and ensure it stays air tight.
Step 6 - When we install insulation, we will have closed cell spray foam sprayed up on the foundation walls, sealing to both the sill and the vapor barrier on the floor. This will give us the air sealing and insulation we need to make this house energy efficient.
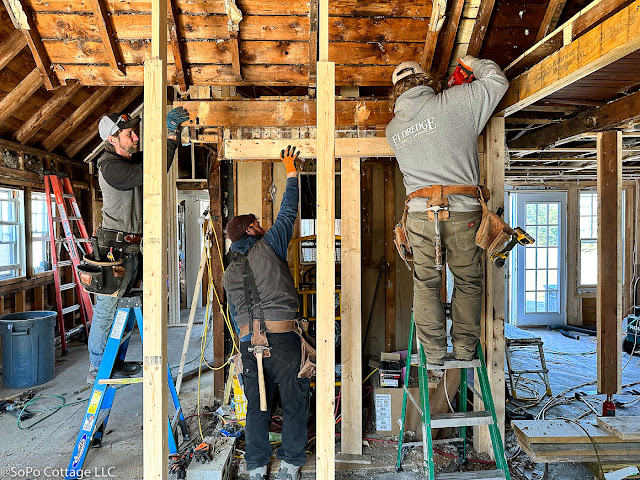
In the meantime, the guys have put all new joists into place and installed a subfloor (with a trap door, so we can get in there to do spray foam insulation). With all of this in place, we can start on the rest of the kitchen framing.
And I don't want to give too much away - but this kitchen is going to be AWESOME!!! Here's a sneak peek of today's progress!
 |
| Future cathedral ceiling!! |
Pin It


 And was it worth all this trouble? Well here's how much it's changed already.