Wednesday, February 24, 2021

The Basic Bungalow Plan - Challenges Ahead!

I can't tell you how refreshing it is to start a project that has some vintage details.  The last couple of houses had zero antique charm when we started, just miles of ranch style molding and hollow luan doors.  And while it's fun to create those elements, it's even better when you can preserve and enhance them. 

I love the antique moldings in this house.  I love the old two panel doors and their antique doorknobs.  I love the tall ceilings and the feeling of spaciousness they create. 


And I love the built in hutch.  Isn't it a great feature with the tall glass doors and drawers - all with glass handles that I assume are original.   But saving the hutch started the problems......

Dining Room Antique Hutch - original to the house

You see, the biggest project for this house is finishing the old attic and turning it into a gorgeous bedroom suite.  But that requires new dormers get added to give us enough headroom.... and that requires some structural engineering challenges.  And as luck would have it, the post should go right through the hutch - or the middle of the dining room.  Ugh!!! I hate both of those solutions!

But let's look at the floorplan and overall design, before we talk about challenges.

A hallmark of bungalows is an open floor plan.  It was considered an expression of hospitality to have the living room and dining room open to everyone.  (Keep in mind, that wouldn't have included the kitchen - which was still exclusively for the woman of the houseπŸ˜‚). In our project, these rooms flow together nicely and with the big French doors leading out to the deck, it has a great indoor/outdoor feel.

Like most bungalows, this one is open through the living room and dining room

The 2 bedrooms are almost identical in size.  We're going to need to address closet space - closets are really shallow - only 13 inches deep!!!  Clearly not big enough for a hanger.  But not much else will change in the bedrooms.

The bathroom is just a bit odd with the shower jutting out in the middle of the room.  My plumber and I think that's because it used to be a claw foot tub and when they tore that out, they just left the plumbing where it was when they created the tub/shower combo.  I'm tempted to put a clawfoot tub back in there, but the reality is they're not great for taking showers and most folks want a tub/shower combination.  But I can move it to a corner, freeing up a lot more space for bathroom storage (and seriously, who doesn't want more storage??)


So what will we change?  First and foremost is opening up the stairway to the second floor.  That will also open up the kitchen and make the whole space much lighter and brighter. It will no longer be the spot for just the woman of the house 😁! The big window in the kitchen faces south and sunlight streams through most of the day.

We will also expand the kitchen by incorporating the mudroom and entrance.  That gives us an additional 4 feet of kitchen space, which might not sound like much, but it will increase the kitchen by almost 40%.  A huge difference!  Now the appliances won't need to be lined up like soldiers standing next to one another. 

See the wall between the living room and kitchen on the floorplan?  I'd dearly like to open it up, but the flue for the heating system runs through there.  I might do some exploratory demolition around the flue to see if we could somehow open up the space, but I'm not optimistic that it will work out.  

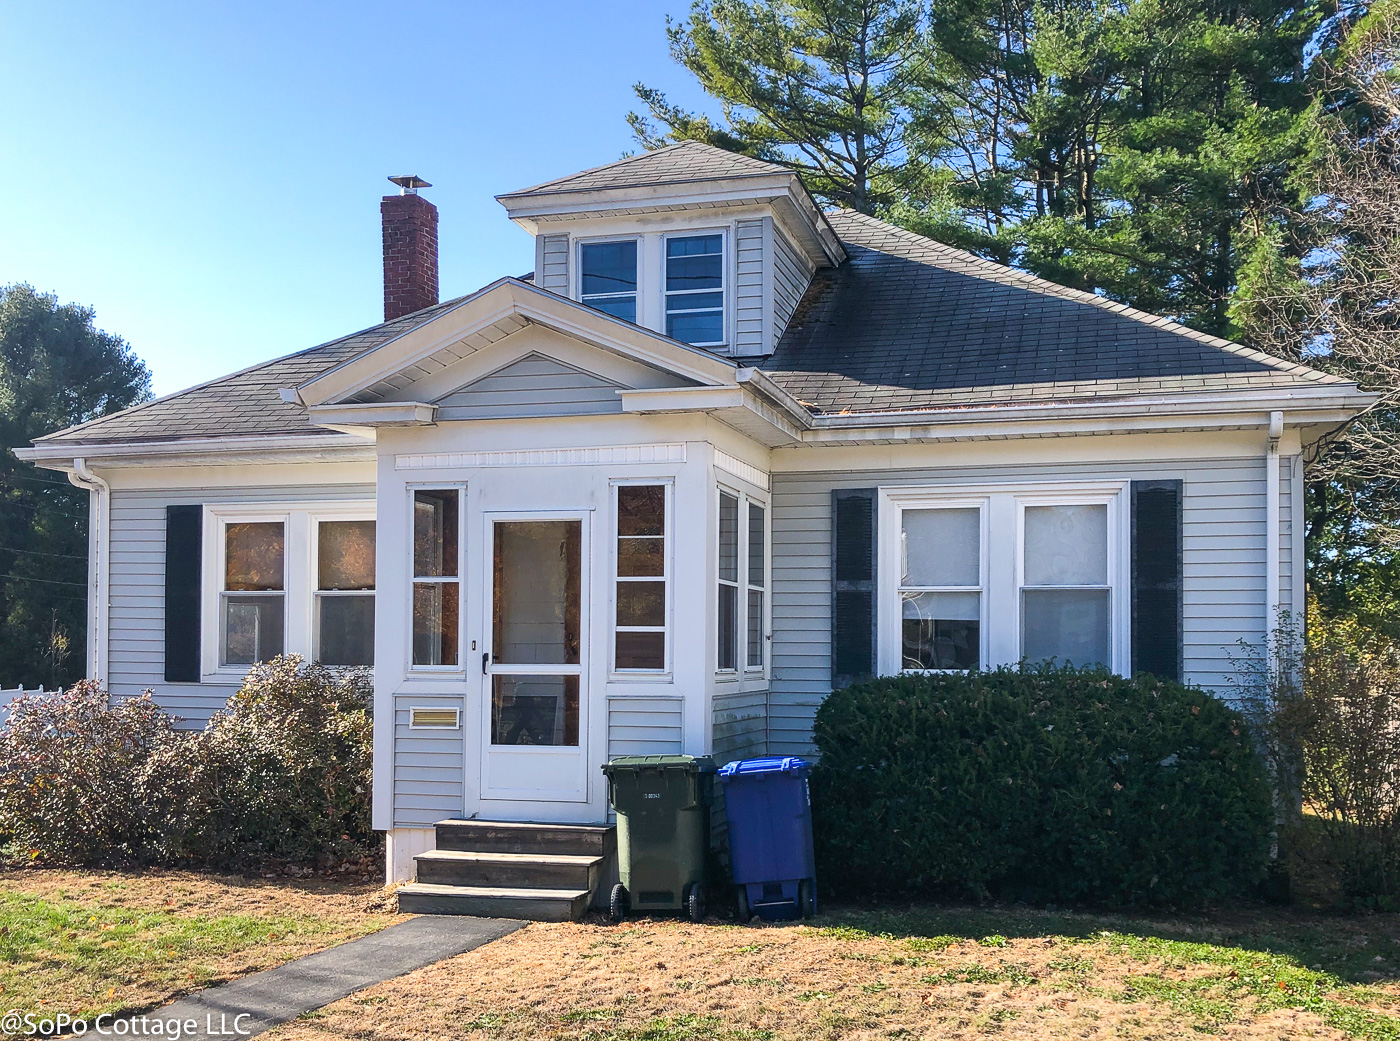
And the fabulous suite that we want on the second floor?  Well, we're on iteration 3..... with probably more to come.  There are serious challenges up there!

Here is what I would like to do - create a large, luxurious bedroom suite.  Obviously we'll keep the existing dormer.  And it would be nice to have dormers on all four sides.  But zoning requirements won't allow that - so we have to settle for two new dormers.  One across the back for the bedroom area.  And another for the bathroom.


The ceilings slope down pretty quickly, so there is tall headroom in the dormers and center of the room, but as you get close to the corners, it gets too low to stand.  I want to do some kind of closets on either side of the bathroom, but am trying to decide how to make them useful, given the ceiling height problem.  

The challenge is how to make this happen.  Structurally, a new post carrying the load from the roof to the basement should go right in front of the dining room hutch.  Seriously, can you think of a worse place?  So we're working with a structural engineer to look at options.  That will probably have some impact on my design, so I'm in limbo until we get that figured out.  So stay tuned, I hope to have an answer on that soon!  

Pin It

Wednesday, February 17, 2021

Basic Bungalow - Digging Through the Past to Plan for the Future

We won't be able to start this project for a bit.  Typically we start the next project while an existing project is getting completed - but that wasn't possible this time.  It took a long time to find something to renovate.  And without a project to work on, the crew has moved on to other work..... now we're waiting our place in line for their availability.  Maybe not so patiently.....😝. 

In the meantime, I thought I'd share some of the behind the scenes work that typically gets done before we lift the first hammer.  Hopefully you'll find it interesting as I give you a sneak peek into some of the decision process that happens at the beginning.

There are a couple of mysteries regarding the bungalow that I'm still trying to solve.  The first is what seems like a simple question.  When was it built?  It's been surprisingly hard to figure out.

Mystery #1 - when was it built?  The City's records show the house was built in 1925.  But the City had a fire years ago and many records were lost in the fire, so they've had to estimate when homes were built.  The previous owner, who lived there for 40 years, said it was built in 1948.  1925 or 1948 - that's a big difference.  I wanted to be a bit more accurate!

I did a deed search and found that the house was built in a subdivision called Sunset View, which was established in 1925.  In 1926 Edwin and Mabel Whiteley bought the lot and the deed required that a single family home be built - and it had to cost more than $4000 πŸ˜‚ (I'm sure they couldn't fathom what today's real estate prices are like!  Although I did an inflation cost analysis and that would be $60,000 today - not sure you could buy a lot for that price)

1925 Sunset View Subdivision Plan

Mystery #2 - Was this always a 3 season porch?
  The property was sold in 1935 and had a house on it by then, so sometime in that 9 year period the house was built.  That makes sense - we haven't found evidence of knob and tube wiring which started to phase out in the early 1930's. The lumber used in the house is slightly smaller than a full 2x8, which points to late 1920's.   And the foundation blocks are similar to another house we did down the street which was built in 1930.   We will probably never know the exact year it was built, but this narrows it down a lot.


And that brings me to mystery #2 - the front porch.  I'm trying to decide what to do with it.  It's decent sized - 8x6 feet and appears to have been used as a 3 season porch.  The insulation is still in the walls..... but no paneling or wallboard, which seems a bit odd.  So do we finish it up again as an enclosed porch? It could be a nice spot on a sunny morning.  Or should we tear the windows and walls out to have an open porch?  It would be nice to see how it looked originally!  BTW - we can't expand it, building codes have changed a lot since the house was built and now the footprint can't be changed.  

Things that make you go hmmm..... why are their footprints on the ceiling?  


Like most bungalows, the porch opens directly into the living room

Our Basic Bungalow
So that led me to do some research on the original house and the front porch.  I couldn't find any really old photos of the house, but I wondered if there were other bungalows that were the same in the neighborhood. So I started driving around and found 4 that were the same!!!  Jackpot!  Interestingly all 4 of them have a different porch style.  Isn't it fascinating to see how different the same house looks with a different porch?
 

4 identical bungalows to ours..... just the front porch is changed


The South Portland Historical Society helped me find this 1954 photo of a matching bungalow around the corner.  Clearly, they have kept it the same across all the decades.  See how it looks now (in the bottom photo above) vs 1954?  Could our porch have been the same?  All the framing on our porch appears to have been redone, so we can't tell what was originally there.  Or, judging from the siding on the lower half, was it closed in from the beginning?
Photo from 1954 - South Portland Historical Society Archives

For our porch, I'd love to build in a bench along one side.  The porch faces southeast and gets flooded with morning light.  Wouldn't it be great to sit out there with a cup of coffee in the morning and watch the world go by?  The windows could be open in the summer to keep it cool - but as long as it's sunny out, it should be pretty comfortable even in the winter.  A sunny, warm spot on a Maine winter morning is a pretty sweet place to be!  

So, I'm curious.  What is your vote?  Should the front porch stay an enclosed porch?  Or should we open it up like the twin bungalows?  

Pin It

Tuesday, February 9, 2021

Introducing the Basic Bungalow

Behold the Basic Bungalow!  Okay, so it's not fancy, it doesn't have all the Craftsman features of the bungalows we saw in our previous post.  But this place is still pretty sweet.  It's got great proportions, with a broad hip roof and a gable over the front porch.  There is a nice deck on the back of the house. Oh, and it's cozy - 918 square feet to be exact. 

Are you ready for the tour?  This is going to be a great project!
Two back doors!
Doesn't it have great curb appeal?
 It has a small front porch that is 'sort of' finished as living space.  I keep thinking there must have been paneling on the walls at some point in time - but it's long gone now, with just the insulation remaining.  It's still TBD if this will be part of the interior or if we should pull out all the windows and make it an open front porch.  

Like most bungalows, as you step inside the front door, you're right in the living room.  That was considered a hallmark of graciousness in bungalow design.  It's a nice sized room with two different closets for storage.  It's probably hard to tell from the photos, but it has nice high ceilings.  A real plus!

The living room and dining room are already nicely open

Can you tell where the sofa was? 😁

The dining room has big French doors that look out onto the deck.  There is an original hutch built into the corner, that I'm pretty crazy about.  The fan, well you probably guessed it, will have to go!


Just off of the dining room is the kitchen.  It's narrow!  7 feet, 4 inches to be exact.  It's a design challenge I'm still trying to wrap my head around.  And I can't tell you how much I hate seeing appliances lined up side by side.  That has to change!

Basically a galley kitchen - 7' 4" wide!  

Oh and there's a mudroom leading to the back door.     Ant spray was included in the sale -  free of charge!! πŸ˜‚.  Hopefully that won't be necessary.  
Tiny mudroom - but hey, it's a mudroom so that's a bonus!

There are two bedrooms on the first floor, almost identical in size.  The front bedroom has 3 windows and a closet.  Oh and the light is on a pull chain in the middle of the room.  Looks like we will have some electrical work to do!

Note the pull chain on the light!  Lots of electrical work required!

And just when I thought I would escape the dreaded wallpaper removal task - I opened the closet door.  Sigh..... stripping wallpaper in a closet is a thankless task.....
I get to strip wallpaper in a closet......the fun never ends!!

The back bedroom is similar in size and shape, but feels a bit smaller because the closet projects into the room.


The bathroom is ready for an update, to say the least!!  It has an odd, narrow footprint.  And another pull chain light.  In fact, it's the only light in the bathroom (wouldn't want to apply makeup in here, I'd look like a drag queen!πŸ˜‚)

But what really has me excited - and will take up most of the budget - is the unfinished 2nd floor.  The  staircase is tucked away between the kitchen and dining room.

There is a lot of space up here.  The existing dormer brings in a lot of light, but for the rest of the attic, the  angled ceilings limit useful living space.  I'd like to add a couple of additional dormers to create a really luxurious primary suite.   Wouldn't that be lovely?

Oh, and since I'm sure you're wondering.  Why the broom?  Because there were droppings.....lots and lots of droppings....  You didn't think renovating an old house was a clean and tidy process, did you?  


See the staircase wall - Pepto Bismol pink!!!

And finally, we have a big basement.  There won't be a lot of changes down here, but it's a great spot for laundry and storage.  And who doesn't need more storage space?

So what do you think?  Can you see the potential?


Pin It

Tuesday, February 2, 2021

So What Exactly is a Bungalow?

A bungalow!  Whenever I tell people I'm working on a bungalow for my next project, I get a warm reaction.  "Oh.... they're my favorite". Or "I love bungalows!!" And why is that?  They're not big, grand homes.  They don't have modern 'must have' amenities like big closets and bathrooms.  And yet they're clearly a style that appeals to many, many people.


So it got me to thinking and prompted some research.


 I have to confess.  I adore bungalows.  I have a lot of books on bungalows and this gave me an excuse to buy a couple more, adding to my architectural library.  From that research, here's what I know.


Bungalows actually started in India as living quarters for officers.  This was adopted by the British and soon bungalows began to spring up in the UK.  It was perfect timing, people were tiring of the highly ornate Victorian style and wanted something much simpler, that celebrated hand crafted artistry.  These designs became very popular.  Much of the styling that we recognize today came from William Morris, sometimes thought of as the father of Arts & Crafts style - whose designs still make me swoon today.  His quote "have nothing in your house that you do not believe to be beautiful" is still one of my favorites.


Source:  Antique Home Style
The jump across the Atlantic happened around the turn of the century.  California became a bit of a mecca for bungalows, which were quickly renamed 'California Bungalows'.  This is when some of the bungalow style began to get copied.  The catalog companies that sold kit homes realized these houses could have mass appeal across the country.  Soon, Sears Roebuck and Aladdin Homes were selling them from coast to coast.  Bungalows quickly became one of the most popular styles of the 1900-1930 time period.  And on the east coast, Gustav Stickley set up his Craftsman Farms in Parsippany, NJ (a great museum house to visit if you get a chance) and created a magazine called The Craftsman, which highlighted Arts & Crafts styling.  In the magazine, he published a series of Craftsman style bungalow floor plans that were quickly adopted across the country.

But not all bungalows look alike.  Many have quintessential craftsman features, but others seem to have features that reflect colonial or even some Victorian features.  That seems to be particularly true here in Maine - where some styles may have taken a bit longer to make their way north.


There are some key features that are expected on any bungalow exterior- 

  • 1 to 1 1/2 stories with low pitched roof
  • Large overhanging eaves, often with exposed rafter tails
  • Front porch with columns
  • Double hung windows
  • Low slung dormers
  • Often used local materials and earthy color scheme
    Source:  Antique Home Style, Aladdin Portland Model
 Interior features also have standard features (we'll talk a lot more about this in future posts!)
  • Front door opens directly into living room
  • Early version of open floor plan (but kitchen was still small and hidden away for the woman of the house)
  • Minimal wasted space - aka hallways
  • Lots of built-ins to maximize space and efficiency
  • 'Sanitary' bathrooms with easy to clean surfaces
We have a lot of bungalows in South Portland that reflect a variety of styles.  I spent some time driving around the area (I'm sure I looked like some kind of stalker, especially when I started taking photos!) to get a better feel for them.  There are some fabulous Craftsman style bungalows in the Willard Beach neighborhood.  Look at how similar this one is to an Aladdin kit home in the photo above!
This charming little blue bungalow was across the street from one of our previous projects.  Isn't it adorable?   Again, note the broad eaves and the exposed rafter tails.  Stone pillars built from local stone are also very typical.


Portland Landmarks has a great publication on their website (What Do We Call It?) that identifies architectural styles in Maine.  There are a lot of homes like this in the area and the left one looks a lot more like our project than the ones with more obvious Craftsman details like exposed rafters. 
Source:  What Do We Call It? Joyce K Bibber/Portland Landmarks


This will be the third bungalow that I've had the opportunity to renovate. Do you remember project #6?


It was a funky bungalow with some charming features -  and some not-so-charming elements - like the odd staircase that went through the back bedroom.  We gave it a great update and and enhanced its Arts & Crafts style.  You can see the whole renovation in the link here.

Bungalow - Before
Bungalow - After


A few years later we did a larger bungalow that had the classic low pitched hip roof - with a porch across the front (very similar to the one in the style guide above).  It had been beautifully maintained over the years, but somehow the 2nd floor had remained unfinished space. What a great opportunity!   We added a large shed gable on one side, which gave us the space to provide two bedrooms and a large bath upstairs.  You can check out the whole renovation here


And now this project is on the drawing board.  I'm deep into the planning phase and I'll share more as it all comes together.


Pin It
Related Posts Plugin for WordPress, Blogger...