Wednesday, August 28, 2013

New Englander - Kitchen Design


Now that we've gotten the infrastructure issues resolved, we can turn our attention to fun stuff - like designing the new kitchen!  This house has a big kitchen, so we've enjoyed figuring out how to use the space.

Our must haves:  efficient work triangle (space between the sink, stove and refrigerator), island or peninsula for bar stools for casual dining and chatting with the cook, lots of storage space, a trash/recycling cabinet and beautiful finishes.

But there are some challenges to what we can do.  We have a major traffic pattern that goes right through the room, connecting the dining room to the living room.  The basement doorway is tucked into the back of the room.  There is a steam radiator in a corner.  And the furnace flue creates a 'bump out' into the space.

So......we looked at lots of different options.  We thought a long island would be a great idea.  But it just didn't fit and interrupted traffic flow.  The next option looked at moving the fridge to the other side of the room, but the cook would get too much exercise cooking a meal!  So we kept evaluation different options....


We finally decided to go with a 'u' shaped design.  It's efficient for the cooks and provides a peninsula for bar stools.  This design does the best job of meeting our 'must have' list.
For extra storage, we are putting two hutch style cabinets on the far wall, with glass doors on top.  We'll add a window seat in between - for a cozy seating area!


And design elements will make it a beautiful space.  White cabinets, dark granite countertops, white subway and glass backsplash.  And stylish light fixtures.  What do you think?


Pin It

Wednesday, August 21, 2013

Introducing the Newest Room - The Master Bedroom

They say that kitchens and baths sell houses.....and we will have a beautiful kitchen and new baths when the house is finished.  But in this case, I think someone is going to fall in love with the new Master Bedroom and it will be a big part of the buying decision.

While not even close to finished yet, I thought it would be fun to give you a sneak preview.

Although part of the second floor, this room was never finished - it was just storage space.  And the reason is, there wasn't a good way to get to it.  The only option was to walk through the bathroom (not an elegant or practical approach!).  But now that we've rearranged the bathroom and created a new hallway, this room is a great addition to the second floor.

But it took a lot of work.  The floor joists were over spanned.  If someone jumped up and down, the entire floor bounced.....I guess that's what an earthquake feels like.  Scary!  So, it had to be beefed up with additional joists and blocking.  Then the guys glued and screwed heavy plywood over the joists to add additional rigidity.


And yes, that is a working toilet in the corner!  For those of you that have been reading this blog for awhile, you'll remember that we usually have a lone toilet exposed to the kitchen.  Well, this has a slight bit more privacy - ha ha.  Can't wait until we get some walls up!

For the roof rafters, we had a similar story regarding structural stability.  We added additional structure to provide strength, but also depth to allow extra insulation.  After all, it's cold up here in Maine!

And my favorite feature - we removed the old collar ties and replaced them with hand hewn beams.  They add structural integrity but also a really great look!  They will look fantastic once we get the vaulted ceiling finished!
We've also added a half bath to the master suite.  It was a bit of a challenge space-wise.  To meet building codes, we need an 'egress' window.  If there was ever a fire, a firefighters has to be able to get in the room with full gear on (it requires over 5.6 sq ft of a single window). With the sloped ceiling, that left little room for other essentials like closets and a bathroom.  So, while we'd love to have installed a full bathroom, a half bath will still be a nice addition.

This week, the new skylight was installed.  It's a Velux skylight, which opens to provide ventilation.  It floods the space with light and with its view of the tree tops, it makes you feel like you're in a treehouse!
Of course we have a lot more to do in here, but don't you think it will make a great space?

Pin It

Monday, August 19, 2013

Dealing with Lead Paint - the Right Way

When we bought this house, we knew that it desperately needed painting.  Paint was flaking heavily in some places and was down to the bare wood in others.  The previous owners said they painted in the 80's, but it hadn't been done since then.  And that was some good news - the laws changed in 1978.  After that, paint could no longer contain lead.  We were hopeful that there wasn't lead paint underneath.

But hope wasn't enough.  While some areas of the siding didn't test 'red' for lead.  The front of the house with the most flaking showed a deep scarlet (even a hint of pink means lead paint exists).

What does that mean?  Well, per Federal law, all contractors that disturb painted surfaces with lead paint need to be certified and follow specific practices to prevent lead contamination.  We want to make sure we're following all the EPA lead safe rules.  And this means a major departure from typical paint practices.  For example, you can't power wash the house (the typical first step).  You can't use power scraping methods, everything has to be done by hand.  And you can't use basics like sandpaper - the biggest contamination danger comes from lead dust and paint chips.

We started the hunt for a painter.  We quickly discovered that most painters simply don't want the hassle of working with lead paint.  It took a lot of phone calls and networking to find someone with the right training and certification.  But we were thrilled to find Andy Lavalle.  Andy has been certified to deal with lead and ensures his crew utilizes the right approach.  We signed the contract to get started, but also signed the EPA notification that this was a lead job and we would be following all safety practices.

The crew quickly got to work and right from the start, we realized this was a very different kind of paint job.  There is a LOT more prep and clean up work involved with a lead paint job.  All of the area around the worksite had to be covered with plastic, to catch any lead particles that would fall.  The plastic was securely attached to the house, so nothing could fall between the cracks.  There was Caution tape put up around the entire area and no one could enter that area, unless they were properly attired with Personal Protective Equipment (PPE)


The guys all wore PPE, including protective suits & booties - they also duct taped over their shoe laces, to make sure no dust contamination occurred there.  And of course they wore masks and gloves the entire time.


They worked on a rainy day, but constantly sprayed the house with water, to minimize any flaking or dust.  With 5 guys, they made quick work of the scraping.


And as you can see, a lot of paint needed to be scraped off!

Front of house prep work
Front of house - ready for paint!
At the end of each day, they had to carefully wrap up all the debris and put it in a clearly marked bag.  It had to be taken to the land fill and identified as hazardous waste.  The area had to be vacuumed with an EPA approved HEPA vacuum.  And the final step - another certified contractor has to come review the site to ensure it meets all the EPA requirements.  That contractor will also have to sign off on the job.
What did it cost?  Well, as you can expect, it's considerably more expensive.  But we also have the peace of mind, knowing we did the work the right way.  Ultimately, this will be a much safer home for the new owners.  And as long as they keep the paint in good repair, they shouldn't have to go through these steps again.

Oh - and the winner of the paint color choices (see pick the color post) is 'left'.  When I tallied all the Facebook and Blog input, it was the clear winner.  And the neighbors seem to like it too!

Paint Colors:  Sherwin Williams - Relaxed Khaki, Oceanside and Timid Blue (for the front porch ceiling).

We will have pictures of the newly painted house posted soon!


Pin It

Wednesday, August 14, 2013

The Trouble With Squirrels


We used to live in a house with bedrooms on the 3rd floor.  The kids rooms were up there (we slept on the 2nd floor) and our daughter kept complaining about noises in the middle of the night that woke her up.  'You're imagining things' we said, 'Go back to sleep'.

Except one day, when we started cleaning out her closet (which really, really needed it),  I pulled out a shoe and was surprised to hear something rattle inside.  I turned the shoe over and a shower of acorns fell to the floor.  The next shoe....the same thing.  And several shoes after that.  

We had squirrels.  And while they never made a mess in the house, they made us crazy.  We tried sealing up the hole - they chewed right back in.  We put up wire mesh....they chewed right back in.  We trimmed all the tree branches away from the house - they tight roped across the power lines.  Finally, we put out Hav-a-heart traps and moved them to a new location.

Now, you might point out that we had a cat and two dogs.  Didn't they notice anything?  Nope!  Heavy sleepers.  They were oblivious to the varmints!

I had hoped my squirrel days were behind me.  But last week, I got a call from our plumber (who always works late), that he heard a squirrel scratching under the eaves, above the bathtub.  He ripped open a section of trim along the eaves to let him out.  But the next morning, I found this hole in the brand new fascia trim.  Sigh....we have a squirrel problem once again.

So....out comes the Havaheart trap.  We loaded it with peanut butter and left it overnight.

And look what we trapped the very first night!!!  A big, mostly white, skunk!  The guys were oddly excited about releasing it.  They couldn't wait to let it out.  They took turns using long pieces of wood to pop the trap open (while I cowered in the background, taking photos - Mike suggested I should have video taped it and set the video to the Dukes of Hazard soundtrack).  But the skunk wouldn't budge!  It took some gentle prodding (staying clear of its backside), but it finally wandered off.  And thankfully, no one was sprayed.  But I hope he doesn't develop a recurring taste for peanut butter!
How many grown men does it take to spring a skunk?

Stay tuned for updates of our next catch - I'll be posting photos on Facebook!


Pin It

Monday, August 12, 2013

Choosing Exterior Paint Colors - Help Needed!

This is the first house that gave us the opportunity to choose the exterior paint colors - all the others had siding that determined that for us.  So I was really excited to get started.  I had my heart set on blue gray siding, white trim and a deep blue front door.

But there was a problem with that.

Typically when you choose colors for the exterior of the house, you should look to your right and left.  Ideally, you want some color variation on a street.  And that's where we have a challenge.  Here are the houses that surround our project.  Seems like everyone loves shades of gray!  And they look fantastic, but I really can't paint our house gray as well.
Geographic Image of Street

So.....back to the drawing board.  The original color was a creamy yellow color, which seems like a good option.  Or perhaps a taupe/beige, which would be a nice contrast with the other homes on the street.   
After sifting through lots of paint chips and samples, we've settled on two different options.  We're painted them both on the front porch.  Both options will have bright white trim.  And we want a punch of blue on the front door.  So, what's your vote?   Option Left?  or Option Right?  I'll be posting them on Facebook as well.  I'd love to hear your input!
Option Left

Option Right

Many thanks!

Pin It

Tuesday, August 6, 2013

The Sad, Sad Story of the Garage


So, after 2 months of deliberation, half a dozen contractor estimates and multiple discussions with the city's Code Enforcement office, we've realized we can't save the garage on our New Englander.  It breaks my heart, because I have really come to love the funky old structure.  But the cost estimate to save it has gone into the stratosphere and it just doesn't make sense to keep it.  As a reminder, you can't actually pull a car into it, because of the angle of the driveway - so it is essentially a large storage space, that takes up most of the backyard.

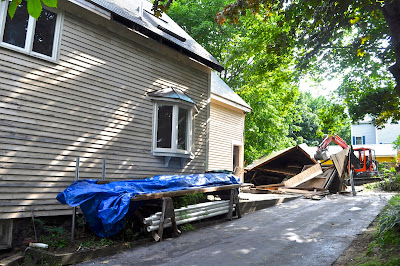
While we're sad to see it go, the demo process was pretty fascinating.  It had to be done carefully, since it's attached to the 120 year old home.  The Plan:  The first step was to disconnect all the electrical power to the garage.  Then, the carpenters cut away the building from the main house.  The most dramatic step - pulling it down.  After that, the slab had to be broken up and pulled out - one piece at a time, so as not to disturb the foundation of the house.

When the big day came, the guys from Lawn Enforcement showed up with their heavy equipment.  I was a bit worried when they introduced Brandon, their backhoe driver, as their 'most careful and fearless operator'.  Well....that's an interesting combo!!!  But he did a fantastic job, the garage came down without a hitch.

And it was so fast!  Take a look at this one minute video we shot: you tube garage demo video

And just so you can get a feel for how much it has changed the property - here's the space with and without the garage.  Eliminating the garage has actually created a nice, sunny backyard.  Now there is room for some plantings and there's so much sun, a little vegetable garden would be perfect.  And it will benefit the interior of the house as well.  We can now have 4 new windows, which will flood the rooms with lots of sunlight!
Before: With Garage

After: Garage Demolition
Best of all, with the money we saved from the garage rehab, we can afford to do a few more nice touches in the rest of the house!  But more about that later......


Pin It

Sunday, August 4, 2013

The Love Letters - Part 2

Thanks to blog reader Denise, we now have a much better history of the family that wrote the letters.
Here's what she learned:

Clyde G. Young was born August 25, 1875 to Julian and Martha A. Gay Young in Maine. Clyde had one sister Nettie and a brother, Leslie. Clyde’s father’s occupation was listed as a “fisherman”. Clyde’s occupation as an adult is listed as “Mariner”. Clyde married Mary E. Marshall a teacher, daughter of George and Rachel Marshall on December 25, 1906. Mary was born about 1883. Clyde and Mary E. had two daughters, Hilma born in Maine about 1909 and Vera born in New York, October 11, 1917.
It appears Hilma did not marry. In the 1940 Census it shows that Clyde and Mary lived on Pine Street with their daughter, Hilma age 31 and Mary’s mother, Rachel age 81. Clyde’s occupation listed on the 1940 census as “Master Mariner” Coast Guard.
Vera married Russell Bubier on July 25, 1938. Russell was born September 9, 1915. Russell died November 10, 1989 and Vera died in Maine February 20, 2006.

Isn't it amazing how much information you can pull together online?  Our thanks to Denise for learning all of this!  I've contacted Clyde and Etta's grandson and hope to get the letters to him soon.

So cool!!!


Pin It
Related Posts Plugin for WordPress, Blogger...