We nicknamed this project the 'Basic Bungalow', because even though it was almost 100 years old.....it just didn't have any vintage charm. It saw some updates in the 80's, which apparently removed some of the antique features, and just looked pretty sad forty years later. We set out to change all that and increase it from its starting point of 900 sq ft to a comfortable 1500 sq ft with the addition of a 2nd floor bedroom suite. And our overriding goal was to enhance the antique elements (and maybe add a couple!).
We made a video of the Before & After - you can click below to view. Or keep scrolling to see the whole story!
In some ways, this tiny porch is my favorite space, because it was a spot you'd want to pass through as quickly as possible when we started - and now you want to sit for a bit and enjoy the sunlight streaming through. (click here for the porch renovation).
The living room got quite an update!!
I stained and finished to blend old and new. And then it was installed around an electric fireplace. This gave the room so much character!! What a difference! (for the full fireplace project, click here)
 |
| Can you guess which sections are new? The left leg, both plinth blocks and the top mantlepiece |
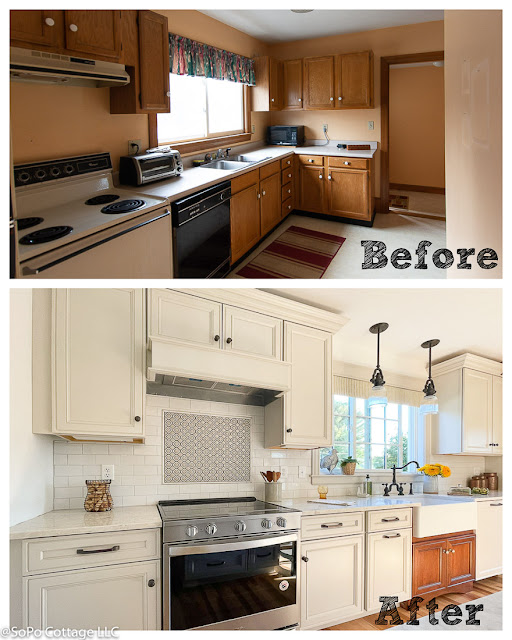
One of the rooms that saw the biggest change was the kitchen. It's only 7 1/2' wide, so it's still a galley kitchen, but by capturing some space from a back porch, we were able to enlarge it and make it so much more useful!
See the difference opening up the wall around the stairway made? It's not a big kitchen, but it feels big because it's connected to the rest of the living space!
 |
| DIY Hint - buy the baskets first and then design the shelving to fit! |
I spent a ridiculous amount of time planning and installing the vintage style bathroom.
 |
| Vintage Style tile - before grouting |
 |
| This bathroom is so much more practical with the tub moved to the corner! |
And while the two downstairs bedrooms didn't change a lot, they still have a lot of charm and functionality (particularly the front bedroom that now has a big end-to-end closet!)
Everything about this space is designed to create a calm, restful spot - away from the rest of the house. And with the giant triple window, it gets a huge amount of sunlight shining through.
 |
| Are those drawers original? Nope! An IKEA hack! |
 |
| This new deck provides wonderful outdoor living space! |


Apologies if this is a rude question to ask, but is there any chance you could give me a ballpark dollar figure for the work you did in the attic? I'm living in my first old home-- a 1924 bungalow similar to this one -- and i'm daydreaming about a similar attic space and wondering how i should budget. I'm a total newbie, so any helpful tips are appreciated :) Thanks for sharing your beautiful and inspiring work!
ReplyDeleteSorry - I never share any cost information! Because every house is totally different and costs can vary dramatically from one community to the next, whatever number I would share wouldn't have much value to you. It's best to talk to a good contractor in your area and get their opinion. Good luck!!
DeleteCan you please tell me what the exterior gray color is, including brand? I have a 50s ranch in New England, and that's a beautiful gray that you used. Thank you!
ReplyDeleteIt’s actually vinyl siding - and I’m sorry, but I don’t remember the color!
DeleteHello, I just found your blog and am really impressed with the design and work done on all your remodeling projects! Could you please provide me with the manufacturer(s) of the brown bath vanity and apron sink? It is deeper in the middle and the sides are narrower. (My son just bought a 100 year old house and needs to update the only full bathroom). Thank you! Mary
ReplyDeleteThat was several years ago and I can’t remember exactly, but I think I found it on Wayfair.
Delete