Tuesday, October 28, 2014

Bathroom Design Times Four!

As we get close to the finish line, it's time to talk about some of the fun stuff!  And we've got exciting plans for the bathrooms.  We have 4 full baths in this house, so there was a lot of planning required.

First Floor Baths

Mirror image baths....getting a big transformation!
For example, we are giving the two first floor bathrooms a total overhaul.  The tubs had so many nicks and scars on the porcelain, we decided to pull them out and replace with shiny new American Standard tubs.  Oh, and those odd windows into the foyer?  We pulled them out.  And the bathroom exhaust fan that vented into the foyer (yuck!), those have been rerouted and now vent to the outside.
Yeah, this needs an update!

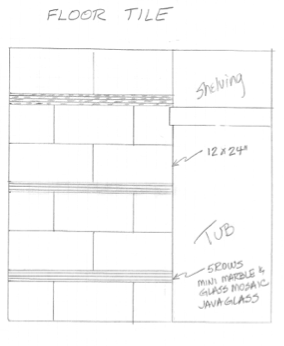
I decided to do the two bathrooms with the same tile, in large part, because I fell in love with it.  The floor tile is a large format (12" x 24") Italian ceramic, with a textured finish.  It's non-skid, which is great in a bathroom and the light color will help these small baths look larger.  For the tub/shower, we'll use a white subway and a fantastic marble border, with three different types of marble intricately  joined together.  It will provide a beautiful accent in the room.

There is never enough storage in a bathroom.  Our solution?  We'll keep the storage units that are next to the tubs and add new vanities with storage as well.

For fixtures, I wanted to add a modern classic look, so we went with these beautiful Grohe faucets in all the bathrooms.


Owners Master Bath

The footprint on the master bath hasn't changed, but by eliminating some walls and that not-so-attractive sink, it's going to look a lot different when we're done.  And the new skylight is bigger than the old one and adds lots of additional light.


We're installing this large new vanity, with a stone top.  Above it, we'll have a new custom cut mirror and Restoration Hardware Asbury sconces.


We'll coordinate that with this ceramic floor, interspersed with stripes of this stone and glass mosaic.


Tenants Master Bath

Since this bathroom is entirely new, we had a little more flexibility with the design.  We're installing the tub under the sloped ceiling.  Thankfully, there is plenty of headroom for a shower.  We'll tile the entire tub space, with white subway tile and a stone and glass mini mosaic to provide some additional interest.  At the far end of the tub, next to the knee wall, we'll build in custom shelving, to provide additional storage.

Then we'll add a new mahogany vanity and toilet.  We're using the same Grohe fixtures in this bath and will add these sconces next to the mirror.

Best of all, we're hoping to start on the bathrooms in the next few weeks!


Pin It

Tuesday, October 21, 2014

The Not-So-Sexy Stuff: Electrical and Plumbing!!

So, even as I write this post, I know a lot of people won't want to read it.  Because tearing out walls is exciting, while wiring and PVC pipe is a little less interesting.  But if you're remodelling a house, this is the really important stuff.

Case in point, not surprisingly, as soon as demo started, we found a mess of knob and tube wiring in this house.  They had replaced it in the easy to reach places (like the basement), but behind the walls and ceilings, it was still there (if you look closely, you can see the two cloth covered lines coming through the tubes and then tying into the light switch).  We want to make the electrical safe and up to code, so it had to go.


In addition, we also had every other generation of electrical wiring in the house.  Yep - BX, Romex, fuse boxes, you name it, we had it.  And it had to be changed out.  Lots of things were done wrong and we wanted to get it cleaned up.  So, the guys got going and before I knew it, the basement was full of old wires with lots of new stuff installed.


Look at all that shiny new wiring going into the electrical box!


I was a bit sad that we had to take out the old pearl button electrical switches.  But they were made for the knob and tube wiring and can't be reused.  The good news - I found reproductions at House of Antique Hardware!


After lots of hard work, we have all new wiring in place.  The drywall guys will patch it all up and it will look great.


And while all that electrical was getting done, we did a pretty major overhaul of the plumbing as well.  The kitchen plumbing was updated, to meet new building codes.  We installed new bathtubs in both first floor bathrooms.  And of course we put a whole new bathroom in the Tenant's Master Suite.  
New First Floor Bathtubs & Insulation
New Tenant's Master Bath


The Owner's Master Bath also got a major update.  The original space had lots of walls, where they really weren't necessary.  It made the space feel very cramped.  We tore them out and suddenly it felt much larger.  But we still had a challenge.  If you are a tall person, you can't see your face in the bathroom mirror.  Tough for shaving or makeup, unless you bend over the whole time!


So when we installed the new skylight, we used a larger unit and were able to extend the wall up.  Jason is 6' 7", so he checked it out for us!!!  And there will be lots of natural light when you're getting ready.  Very cool! 

Now we just need the City to come out and inspect - and we're ready to move forward!


Pin It

Thursday, October 16, 2014

Creating a Master Suite

When we bought the house, the Tenant's side had an awkward 2nd floor bedroom.  It wasn't very inviting.  In large part, because of the following:
1)  It was really dark (just one window in the whole space),
2)  Had a small closet,
3)  Included a useless hallway
4)  Had lots of of attic space, but it wasn't well utilised
5) And of course there was that mysterious hole in the ceiling

We wanted to fix that.

Demo Day!!!
So, we started (as we usually do), by knocking down walls.  By moving the knee wall back 5 feet, we suddenly gained a lot of space!  Our goal?  Add a full bath, a larger closet, a larger bedroom and lots of light.
With the walls gone, the guys could start with brand new framing.  Much easier and quicker and it allowed us to put the walls where we wanted them (note - we added a lot more structural framing below, to accommodate the weight of the new bathroom!).

Next, the skylights.  In these old houses, I think skylights are one of the best value items you can add.  They're not cheap - I use Velux which is the top of the line.  They're guaranteed for 10 years .  In fact, I've bought houses with Velux units that were 25 years old and still worked well without any leaks.  
And it's so exciting to suddenly see the roof opening and the sunlight flood in!


Love the bigger space and bright sunlight streaming in!

The difference they make in a space is amazing.  This is the upstairs stairwell, before we started.  
And this is after.  The natural light that floods the space is great!  Oh, and notice the old lath?  Well, when we jacked up the first floor to make it level, all the plaster cracked and had to be removed.
Bathroom - Before (attic space)
Next step, the bathroom is framed in, with plumbing ready to go.  The skylight in here makes it such a nice inviting space.  Wait till you see the marble & glass tile insets we're going to do in here!    And for reference, here's the attic space that was 'before'.  
And here is the rest of the space.  Nice change, don't you think?
Before
During

Before

Oh, and the hole in the ceiling?  Well, we discovered a pie tin up there that was catching drips from a badly flashed 'stink pipe' (plumbing vent).  Our roofer fixed it for us in and the pie tin is now history.

So, we didn't add a dormer or make any major structural changes - but by removing walls, reclaiming lots of unused attic space and by adding skylights - we have made it a big, bright usable space.  We need to finish electrical and plumbing and then on to drywall.  

Nice change, don't you think?


Pin It

Tuesday, October 14, 2014

Thank You For a BIG Milestone - 500,000 Views!

Wow, as we near our 3 year anniversary, we hit an amazing milestone.  Half a million views!!  Incredible!  Thanks so much to all of you that follow our adventures as we renovate and restore these wonderful old homes.

And because I'm addicted to stats, I thought I'd share a few with you:


Here are the top 10 cities that read the blog:
 
Interesting mix, don't you think?

The typical viewer reads 1.84 pages and spends 1 minute and 54 seconds on the blog.  And 42% of our readers are new new each month.


So, many, many thanks for your support.  We're working hard to complete our latest project and will continue to share the progress!  Stay tuned for another update this week!

Pin It

Tuesday, October 7, 2014

The Deck Project That Just Kept Going and Going and Going

Okay, so we knew that the deck needed some work.  And that weird staircase that ended 8 feet up, in the middle of the backyard - well, that had to go!

But we really didn't bargain for how much work was going to be involved.

So here was the starting point.  Clearly, the gutters had been flooding some areas of the deck for years, creating some rot.  But it seemed limited to the edges and the railing (in fact, one of our contractors took a tumble when the railing suddenly gave way as he leaned on it!)


But we didn't realise that the deck ledger boards were untreated wood - a big no no - and had rotted as well (the only good news was there wasn't any rot on the house itself!)

Or that the 'doghouse' structure that covers the basement staircase had rotted away.

Or that the deck didn't have any footings under it.

Oh, and there was that little issue of grading, so water kept coming into the basement when we had a heavy rain.

So.....we got to do it all over.  And we did it right this time.  But it meant we had to tear everything out and start all over again.

And yeah, that costs a whole lot more money.

The guys from Waterhouse Builders did a great job - as usual!  They started with the doghouse structure.  They had to tear out all the rotted wood.


And then we realized that putting new wood in an area with drainage problems, was just inviting future issues.  So, they jacked up the whole structure and Shaun Scott, our mason, came in and built a new concrete block wall.  That allowed us to change the grading and gave us a solid base to rebuild.

Next step?  The guys put up new, pressure treated ledger boards, to start the deck.  They'll go back and add a layer of flashing, before the decking goes in, to make sure that the water drains completely away from the house.  In this photo, you can also see the fresh new barn boards that finish up the doghouse.


But before they could go any farther, they had the back breaking work of digging footings.  It doesn't look like much with the dirt back around them, but the holes are 48 inches deep and 12 inches in diameter for the new concrete piers.


Once the foundational elements were in place, things started to go quickly!   With the old staircase out of the way, they tore out the remaining roof structure, to create a nice 2nd floor deck off of the Owner's Master Suite.

 And now that we have real footings in place, they started rebuilding the joist structure, that will carry the load of both decks.
Lots of decking and the rebuilt doghouse for the basement entrance
The quickest part of the project is the decking.  Didn't they do a beautiful job of installation.  And the new railings have a wide top on them - perfect for balancing a glass of wine or a beer :-)

But my favourite part?  The PVC skirt boards and lattice, that really dress everything up (and never needs painting!).  
It's not quite finished, but doesn't it look great?


Pin It
Related Posts Plugin for WordPress, Blogger...