We nicknamed this project the 'Basic Bungalow', because even though it was almost 100 years old.....it just didn't have any vintage charm. It saw some updates in the 80's, which apparently removed some of the antique features, and just looked pretty sad forty years later. We set out to change all that and increase it from its starting point of 900 sq ft to a comfortable 1500 sq ft with the addition of a 2nd floor bedroom suite. And our overriding goal was to enhance the antique elements (and maybe add a couple!).
We made a video of the Before & After - you can click below to view. Or keep scrolling to see the whole story!
Our starting point was pretty bland and boring. The front porch was an unfinished space with insulation hanging out of the walls and footprints on the ceiling. But we changed all that! New door, custom stained glass house numbers, stone mosaic floor, and bead board paneling.
In some ways, this tiny porch is my favorite space, because it was a spot you'd want to pass through as quickly as possible when we started - and now you want to sit for a bit and enjoy the sunlight streaming through. (click here for the porch renovation).
The living room got quite an update!!
What was originally an odd closet (but looked like a staircase entrance) became a storage cabinet with shelving above. I staged it as a dry bar, but the new owners can use it any way they want.
The main wall of the living room was a blank slate and needed some character. I found pieces of an antique mantle at
The Old House Parts Co and thanks to the artistry of
Oak & Laurel Workshop, the missing pieces were carved to match the original.
I stained and finished to blend old and new. And then it was installed around an electric fireplace. This gave the room so much character!! What a difference! (for the full fireplace project, click here)
 |
| Can you guess which sections are new? The left leg, both plinth blocks and the top mantlepiece |
The dining room changed as well. The biggest change was opening up the wall to the kitchen and the stairwell - which made it feel huge!! I had the newel posts custom turned and then stained and finished them and the matching handrail.
We saved the original antique cabinet - just repainted it and cleaned up the glass pulls.
And last, but not least, we installed plate-rail height wainscoting in the dining room. It's a historically correct detail for a bungalow and it just adds so much interest. Above the wainscoting I installed a very subtle wallpaper that reflects a vintage style, without stealing the show!
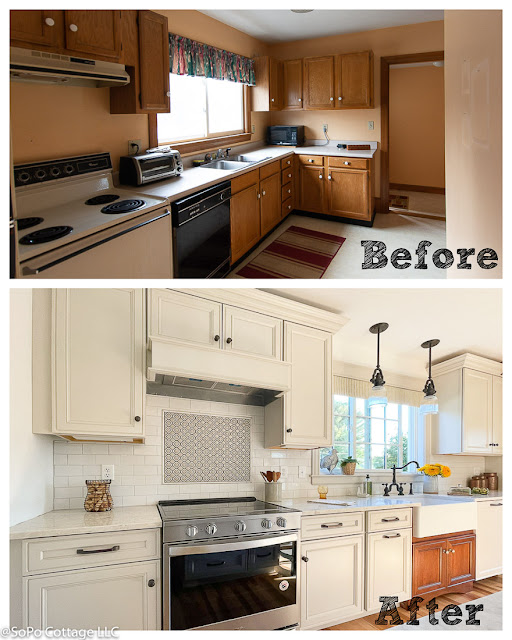
One of the rooms that saw the biggest change was the kitchen. It's only 7 1/2' wide, so it's still a galley kitchen, but by capturing some space from a back porch, we were able to enlarge it and make it so much more useful!
See the difference opening up the wall around the stairway made? It's not a big kitchen, but it feels big because it's connected to the rest of the living space!

And the mudroom space is pretty sweet too, with lots of places to store the winter essentials we need in Maine. (kitchen story is here).
 |
| DIY Hint - buy the baskets first and then design the shelving to fit! |
I spent a ridiculous amount of time planning and installing the vintage style bathroom.
 |
| Vintage Style tile - before grouting |
 |
| This bathroom is so much more practical with the tub moved to the corner! |
And while the two downstairs bedrooms didn't change a lot, they still have a lot of charm and functionality (particularly the front bedroom that now has a big end-to-end closet!)
I staged the back bedroom as a kids room with this antique school map we bought while living in the Netherlands.
But as big as some of these changes might seem, the real work was done on the 2nd floor! The unfinished attic turned into a dramatic bedroom en suite by adding two large dormers. It took a lot of structural work and we hid the massive beams with reclaimed lumber.
Everything about this space is designed to create a calm, restful spot - away from the rest of the house. And with the giant triple window, it gets a huge amount of sunlight shining through.
 |
| Are those drawers original? Nope! An IKEA hack! |
The original front gable turned into an office area.
And the 2nd new dormer because a relaxing bath, complete with funky angled ceilings and reclaimed wood beam. Oh - and an amazing marble mosaic floor!
When we started, I anticipated the project would take 4-5 months. Instead it took 8, thanks to COVID challenges and supply chain issues. But the finished product was totally worth it, don't you think?
 |
| This new deck provides wonderful outdoor living space! |
Stay tuned to our next project - or follow along on Instagram or Facebook!
Pin It