Thursday, January 26, 2017

Fast Forward - Framing the Duckling

Framing is always one of the most exciting phases of a project.  It goes quickly and you see dramatic changes, almost every day.

And this project is particularly dramatic, because we're expanding the house so much.  What was a small footprint, will become a large, gracious home.

We started in the middle of December, just as the snow began to fall and it turned really cold.  The material showed up, the same time as the snow.


The first step was getting the first floor in place - so the dining room, mudroom and garage began to take shape.


But I got really jazzed, when the new master suite and garage started to take shape.  That front wall was so exciting to see!!!

The guys did a fantastic job, replicating the gentle 'swoop' of the original gambrel roofline (I'm sure there's a real architectural term for the swoop - anyone know what it is??) on the new structure.  We really wanted to capture the original style of the house in the new addition.

The second floor was a bit more complicated, as the guys integrated the original structure with the new one.  Figuring out the new angles was a challenge.  At one point, it was easier to cut a hole in the roof and do it the old fashioned way!


With that determined, Demo Brothers removed the back of the old house, making way for the new structure.


A key part of the project was tying the old house with the new.  That requires installing a new ridge beam.  This will create space for the new dining room and fourth bedroom above it.

And suddenly, what had seemed like a small, tight little house - was suddenly a huge space!

New 2nd floor bedroom space
And best of all?  The views from the 3rd floor deck were even better than we thought!  We all stood up there gawking :-)  Depending where you stand, you can see Fort Gorges, Spring Point Lighthouse and the islands.  And standing up in the treetops is pretty cool too!
Did I mention I have a fear of heights?  This is the angle with me hugging the other roofline!


So now the framing is completed.  Next comes roofing, electrical and plumbing.  But what do you think?  It's changed a bit :-)

Pin It

Tuesday, January 24, 2017

Front Facade: It All Started With a Starfish

One of the things I really wanted to change about the existing house was the curb appeal as you pulled up to the door.  While I LOVE the gambrel roofline, the windows were awkward and the front door location didn't work with the new interior stairway configuration.

And the inspiration for the front of the house?  This door knocker from Michael Healy.  I love this big, oversized starfish.  And I could immediately visualize it on a blue front door.


With that decision made, the rest of the design started to fall into place.  First step, we centered the second floor windows (which seemed a bit more logical ).


Next, we wanted to give the front facade a little more dimension.  So the guys added an extension above the windows.  We will use an accent siding in that space and a large dentil molding underneath - right above the windows.  (I really wanted to try and get a nice shot without the port a potty, but it seems to show up in every photo!)


Pottery Barn - Avalon Sconce
Flanking either side of the front door, we will install these nautical style light fixtures from Pottery Barn.

For the front steps, we have some big limitations, due to setback constraints and code requirements.  But I'm noodling over granite steps or else a more traditional set of wooden steps with a white railing.


On the new section of the house, we're adding a door into the mudroom.  I'm still deciding on a garage door style, but we'll install a big barn light over it, to provide lots of illumination for the driveway.
Restoration Hardware Vintage Barn Light

Here is the first window going in!!  Big difference, don't you think?
New window and door configurations (temporary door so the new one doesn't get messed up!!)
Of course there's lots more to do, but we're making progress! Pin It

Wednesday, January 18, 2017

Before the Snow Flies......Barely.....

This project may look like it's moving very quickly, but nothing could be further from the truth.  This is month number 5 of the project.  We've been at this awhile!

I bought the house in August.  We spent the rest of the month and September finalizing the design and getting all the building permits.

We got bids from foundation firms and promises that they'd get started in 2 weeks......6 weeks later, they actually started (every contractor we talk to is so busy, it's tough to get on anyone's schedule!).  We really wanted to get the poured concrete done early, before the weather got too cold.

And we ran into our share of challenges.  Come to find out, the back of the foundation didn't have any footings.   So there was no way we could use it for additional structure with the addition.  The guys had to tear out the back of the house, built temporary supports (that's the funky X you see under the back wall) and dig out the old foundation - allowing new footings to be put into place.  Time consuming and costly!


This cool gadget polishes the new garage floor!


With the footings in place, they put up forms for the new walls and poured the foundation.


The other key thing we needed to do, before it was too cold, was the driveway.  Like everyone else, Ingraham Paving was swamped with work that needed to get done before it got too cold, but thankfully they finished the day before they stop for the season!  This will give us a mud free work zone, for the rest of the project.

Oh, and it provided a nice foundation for the port a potty.  Pretty important, since we don't have any plumbing in the house!


And now that it's really cold and snowy?  We're moving forward with framing and things are taking shape quickly!  Can't wait to share the rest of the project.
Framing Material Delivery


Pin It

Monday, January 16, 2017

Tough as Nails - aka Winter in Maine

I spoke with someone living in the south the other day and she asked if we have to stop working during the winter months in Maine.  "Once it starts to snow", she asked, "don't you have to put everything on hold till spring"?  I laughed, because nothing could be further from the truth.

But that's in large part, because you have to be pretty tough to work here when it gets cold.  It takes a 'we can do it attitude' every single day.  Here's an example:  First step when getting started on the new foundation walls?  Chipping the thick layer of ice off the top of the concrete!  It's a slow, painstaking task.  But it's the only way to do the job right.


When the temperature is 2 degrees, with a wind chill of minus 23..... they're still smiling!  In fact, Brian mentioned that we've been really lucky with the weather.  What's cold weather and a few snowstorms?
This is Maine!


And when one of our carpenters has an accident with a nail gun (not on our project, I'd like to add), he's back on our job at 7:30 the next morning (yeah, hard to look at, I know!!).
Ouch!!!
Inside the house isn't much warmer than outside, since we don't have a furnace yet - although these fancy plastic windows help break the wind a bit.  But hey, 3 degrees is 3 degrees!

And in the deep, dark days around the winter solstice, the sun sets a few minutes after 4 pm.  So there isn't  even a lot of sunshine to help warm things up.

So do you have to be tough as nails to work here in the winter?  It certainly helps.  And one of the things I love about Maine is the work ethic of everyone I work with.  They're committed to getting a quality job done, no matter what the challenge.  Tough as nails indeed!!


Pin It
Wednesday, January 11, 2017

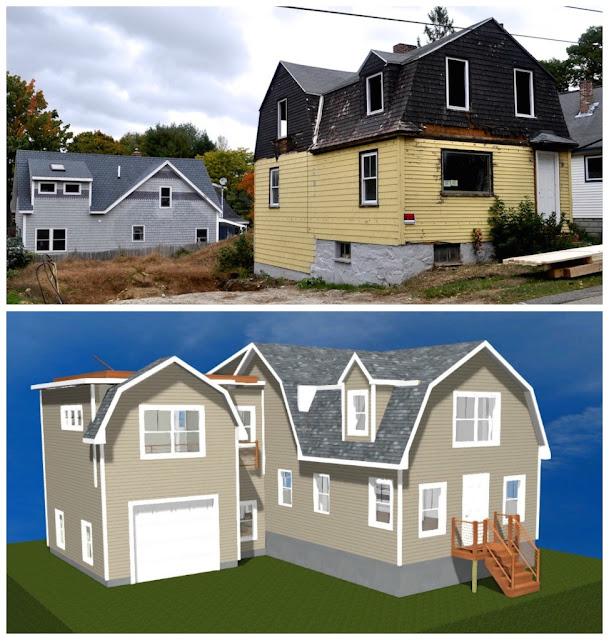
The Ugly Duckling - The Plan to Become a Swan

Since this house was already gutted when we bought it, it gave us lots of flexibility on defining a new floor plan.  There aren't a lot of things in our way!  But to figure out what we want to include, I've been reading lots of articles and listening to buyers/realtors, to come up with a list of 'wants' for the house.  There are a LOT of 'wants':

The trick is to see if we can incorporate them all into our floorplan!

Current Plot Plan
Of course figuring out a floor plan, when you're connecting to an existing old house, is tricky.  It's like a giant geometry problem.  Not only do we need to connect with the existing structure, we have lots of building code requirements we need to meet.  For example, we can only build on 25% of the lot.  That limits the size for an addition.  And any new construction needs to meet setback requirements, in our case 20 feet from the street.  So that adds some additional complexity that needs to be considered.  But we're lucky, since the house sits so far to the right, a new addition will 'balance' the house on the lot.

We played with several iterations, but finally settled on this design (note: when working on an old house, plans are a good starting point, but the final configuration will probably be a bit different!  There are always some surprises).  We're going to do a big addition.  The original house only had 1200 square feet of living space.  Our finished project will be 75% bigger - 2100 square feet of living space, plus the garage.

First Floor:


So our starting point was as basic as you can get.  3 rooms with a big brick flue going through the middle of the house (it looks like there might have been a wood stove in the living room at some point).
The new design - adds a new dining room across the back of the house.  That gives lots of room for a big table and a crowd at Thanksgiving.  There is also a large kitchen which is great for entertaining big groups or small!  And the living room will boast a gas fireplace, with built in bookcases on either side.  Adjacent to the living spaces are utilitarian rooms.  There's a large mudroom that lets you shed coats and boots as the owners come in from the garage (this is Maine after all!).  And there is a convenient half bath, off to the rear.

Remember the scary staircase from the before photos?  We will rebuild it, to meet code requirements, and are leaving it open above, to allow additional sunlight to flood the rooms.  That's the southeast corner of the lot and will be sunny from morning through afternoon!  Oh, and the staircase change moved the front door to the center of the house - and we really think it looks better that way.  

The second floor also has lots of changes!  The original floor plan was pretty compact - 3 bedrooms and a bathroom.  We've made quite a few changes and will now have 3 bedrooms in the main house and a master suite in the new addition.  We have also included a laundry room since most of the laundry is on the 2nd floor!  Who wants to drag everything down to the basement, if you don't have to??

See that hallway, leading to the back of the house?  That will go to a doorway, that will take you up to the 3rd floor deck, with our great views!  Check them out here

But just as important as getting the interior right, we wanted to get the exterior right.  I so love the graceful curve of the original gambrel roofline.  So we will highlight that on the new addition as well.    And we're installing all new windows (in most cases in new locations) to make the house as light and bright as we can!
For some reason, the 3rd floor deck didn't appear in this 3D CAD representation, but you can see the platform for it.
Quite a change, don't you think?  Is this a house that will appeal to a future buyer?  


Pin It

Thursday, January 5, 2017

Yankee Ingenuity - Do We Have Water Views?

One of the first questions we tried to answer was whether we have water views from the house.  We're close to the water and sit up on a hill.  You can't see much from the current windows, thanks to trees and houses, but if we go up a level, we think there are water views.    I'd love to put a 3rd floor deck on the house, but need to see if it makes sense (we have a 3rd floor deck on our own house and it's our favorite place to have a cocktail at the end of the day)
Source:  City of South Portland
 Of course if we had a drone, we could have figured that out pretty quickly.  But we're thrifty (aka cheap) and didn't want to go buy one.  Plus there's all that FAA registration stuff, which seemed way too complicated.

And then Mike from Waterhouse Builders came up with a clever solution.  He has a GoPro camera.  We could connect it to a long pole and use it to figure out the view.  Brilliant!


With my fear of heights, there was no way I could climb out the window...but he was up to the challenge.  He handled the camera, I controlled the GoPro from the tablet, standing safely on the floor.


What did we find?  Woo hoo!  Looks like there are some water views there!  Not only that, we can see Spring Point Lighthouse and Fort Gorges.  And it's pretty fabulous to have such a great treetop vista!  What a great vantage point.


So our next step is to include a 3rd floor deck in our design!!  Can you see yourself sitting there with a cocktail in hand at the end of the day??


Pin It

Tuesday, January 3, 2017

The Ugly Duckling: Before

New Year - New Project!  Does it get any better than that?  And this one is a challenge, that's for sure.

I bought this house after someone else had already done all the demo work.  So I don't have any typical 'before' photos to share.  (I also don't have any original woodwork or design details, so we'll be starting fresh here - but more about that in a future post)  It's essentially just a shell of a house with a big hole in the ground, that they had dug for an addition.

This was a private sale.  But how would this have read in a real estate listing???  I'm sometimes amazed at the remarks that accompany houses that need work!  I keep wondering if it had come on the market, what would they have said??  'Needs a little TLC?'  'Ready for your decorating touches?'  LOL!!!

And I love it!  It has such wonderful cottage style!  Perfect for a beach house, which is great, because Willard Beach is right around the corner.

Don't you love the T-shaped gambrel roofline?  That's something we really want to keep!

There is one original window left - so at least we know the original design had 2 over 1 windows.  We'll replicate that moving forward.


The house is 1200 square feet and according to the City website, it was built in 1920.    The first floor has a pretty typical floor plan:  hallway/foyer, living room, dining room and kitchen.
Living Room looking towards Dining Room and kitchen
Original, not to code, staircase.  Steep steps!!!!

Here is the floor plan:  

We do have the original staircase, but it is woefully not to building code, so we will need to change it.  And given how steep and narrow the stairs are (not to mention lack of shoulder room at the top! You need to twist to your left as you make the climb), the future owners will be happy about that!


The second floor has three small bedrooms and a bathroom.  Thanks to the gambrel roofline, hanging pictures would be a challenge, since most walls slope a lot!

Bathroom (left) and Front Bedroom (behind stud wall)
And here is the second floor plan:

What do you think?  Does it have potential?
Old photo - Before any work was done!

Pin It
Related Posts Plugin for WordPress, Blogger...