


The result? A real wow space! With lots of light streaming through!

 |
| Want to keep this in your Pinterest file? Pin here! |
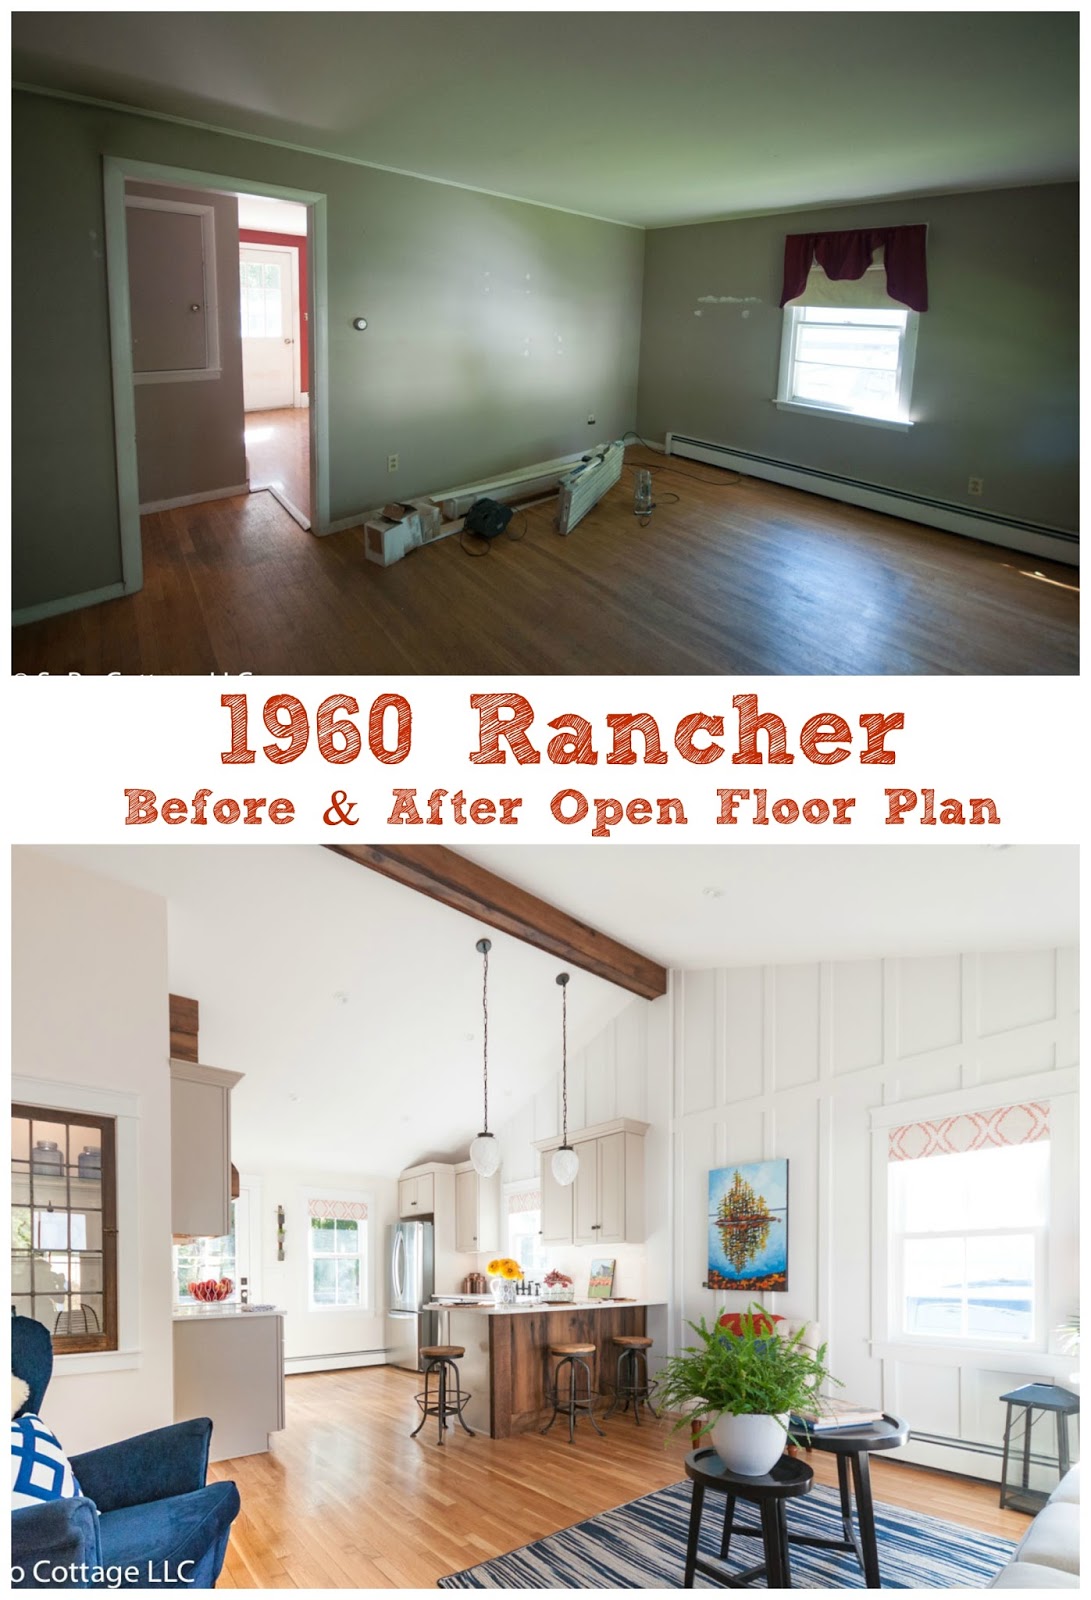
 Board & Batten Wall - I don't know anyone that's ever found a shiplap wall in Maine. But board and batten is traditional and adds some great architectural interest to the room. It's also a great way to highlight the volume of the space.
Reclaimed lumber - we wrapped the structural ridge beam with reclaimed wood, but didn't stop there. We also created a custom stove hood as well as a backing for the peninsula (an added bonus - it can take lots of abuse from scuffs and scrapes from the stools!).
Recessed lighting - to keep the whole space well lit, we installed lots of LED lights across the ceiling. They won't need bulb changes for many, many years. But thanks to dimmers, they can make the space bright or cozy.

Natural Light - thanks to new windows and a skylight, the whole space is light and bright. The updated 2 over 2 styling gave the room a bit more character. But they also have a lot more glass than the old windows and bring in a lot more light. Oh, and they're much more energy efficient!
 |
 Details - we always incorporate special touches like these gorgeous doorknobs with the crystal handles. Paired with the new two panel doors, they give the house some character that was missing with the plain old luan doors.
And of course I love the built in china cabinet we created from the antique window I found at Brimfield Antique Mart. It's a huge improvement over the blank green door that was there before.

 It was so much fun to hear people's reaction as they walked through the door during the Open House This grand space is such a surprise in a 1960's rancher - and will be so nice for the new homeowner.
Living Room Sources:
- Window Treatments - Fabric from Home Remedies
- Sofa - IKEA Ektorp
- Blue Chair - IKEA
- Nesting Coffee Tables - Crate & Barrel
- Side Chair - Bottrell Tufted Side Chair from Wayfair
- Blue Arm Chair - IKEA
- Rug - Zara Home
- Painting - Holly Lombardo original
- Doorknob - Nostalgic Warehouse
- Lantern - Pottery Barn
- Pendants - Restoration Hardware
- Antique Double Mirror - Brimfield Antique Mart
- Paint Colors - Sherwin Williams: Walls - Downy White, Trim - Extra White
Pin It

You've really transformed this house into a light-filled haven. I especially like that you did the board and batten, as I was never that crazy about shiplap. And the china cabinet is genius.
ReplyDeleteWell done you two! This is the size house I just worked on, 915 sq without a basement. A single woman moved in and I do hope she is happy with everything.
ReplyDeleteThat's a great sized house!!! I think more and more people just want to downsize into something small and manageable, that has everything updated!!
DeleteWhat is the square footage of this house? I'm thinking of doing something similar with mine. Ours is approx 1800 sq feet. We have 3 bed 2 bath. Thinking of making main living areas into open concept like this one.
ReplyDeleteThe first floor was around 750 square feet with only 2 bedrooms. Yours seems like a giant house in comparison!!
ReplyDeleteHow much did the renovation cost?
ReplyDeleteWhat was the cost?
ReplyDeleteJust an FYI - I never share how much it costs to do a renovation. Costs vary widely in different regions, so it’s impossible to compare. And with the recent run up in prices, this project would be much, much more expensive today
DeleteDid you remove the roof in order to vault it or did you work beneath your existing roof structure?
ReplyDeleteWe worked below the existing roof, creating a truss like system per the structural engineer plans.
DeleteHello! Gorgeous renovation! Just wondering...you mentioned earlier that the cost of raising the ceiling was higher than it might have been because of the design of the original roof. Was that because the house was built with rafters instead of a system of trusses like more modern homes are? Thanks for all the inspiration!
DeleteThe house didn’t have a structural ridge beam, so we had to add one. If we had engineered trusses, it would have been even harder.
DeleteWhat were the original rafter sizes?
ReplyDelete2x6, 2x8?
What size of new rafters were sistered to them?
2x8, 2x10, etc?
What width/depth size LVL did you use for the ridge beam?
Sorry - that was a long time ago and I can't remember. But since every house is different, you really should consult a local structural engineer to see what you need for your project.
Delete