Wednesday, November 9, 2016

At Long Last, It's Kitchen Time!

After months and months of planning, it's always so exciting to see the kitchen start coming together.  And this one has so many custom touches, I've barely been able to contain myself.

Look at the amazing patch of the old floor vent!
So here are the highlights:

Once the walls were done, we gave them a quick coat of primer and then set to work.  We ended up having to remove about half of the original wood flooring - it had so much water damage and old, nasty adhesive, it just made more sense to start fresh.  We found new birch flooring that blends in well with the original floor.  And we had enough antique flooring to perfectly match bad spots in the old floor.


Kyle got the cabinets installed and it started taking shape!  The cabinets are from Thomasville with a Hudson door style.  Around the perimeter, they are an offwhite color called pearl.  And the island is black - to keep the space from being too bland!

We took some of the cardboard and created a countertop template - to figure out exactly how big the island top should be.


The template guy came the next day and created our electronic laser template.  Then I waited impatiently for two weeks, until the finished counters arrived.


This is a Vitatera quartz called Everest.  It does a great job of blending the taupe and black highlights we're using on a white background.


One of the key custom elements in  this kitchen is the custom copper hood from Copper Kitchen Specialists.  It's such a great statement piece and lends a nice warmth to the room.  It's a BIG project to install.

Building on the interlocking circle design, I took the  circle pattern from the hood and created an original design for the glass cabinets.  I had great fun working with Jim Nutting of Maine Art Glass Studio.  We went through his vast collection of art glass and decided on a replica antique glass, that has some waviness and real character in it.


Jim Nutting - Maine Art Glass Studio
I picked them up this week and am thrilled with how they came out!


Next step was final refinishing of the floors.  John Miller did a fantastic job getting it all sanded and polyurethaned.  Don't the floors look amazing!  See how beautifully the old and new birch blend together?


And here's the sneak peek with progress thus far.  Pretty nice, don't you think?
Love the giant stainless farm sink!!
Oh, and are you wondering about the pantry door color?  Well there was a lot of input on the door color - with about half going for paint vs. non-paint.  At this point, I'm tempted to leave it alone and let the future owners decide.  But I have a few more days to make up my mind!

The guys are putting in the crown molding today.  I still need to do the tile backsplash and the final painting starts soon.  The last step will be the banquette and lighting!  So a little more work, but we're getting close to the finish line!


Pin It

Monday, November 7, 2016

How Would You Use a Bonus Room?

We didn't set out to have a finished room in the basement, when we first started the house.  But as we looked at the space and heard from the previous owner that it was his favorite room in the house, we thought it needed a second look.

I wasn't excited about it at first.  Dark brown paneling, ceramic tile floor and a wood stove vented through an unlined chimney.  But once we gutted the space, it revealed its advantages.  It's a dry basement (even with all our recent rain - so rare in this area)!, it has lots of windows (4!) that let in bright, natural light, and there is already plumbing for a half bath.

So, we got to work!  First, we installed new insulation and drywall.  


And then Mainely Ceilings installed a new suspended ceiling, magically hiding most of the pipes and wires that criss cross the space.  An amazing feat!


This week the guys are adding some trim and leveling the old floor.  Then we'll spruce up the bathroom and do a little painting.  But that's the extent of our plans.  Because in reality, how the space is used will depend on the future homeowners.  They can decide what other improvements they want to make.


So, I'm curious.  How would you use this space?  Man cave?  Craft room?  Kid playroom?  What would work best for you?


Pin It

Wednesday, November 2, 2016

Master Suite Update - Lots of Progress!

The construction business is booming right now.  There is such demand for skilled craftsman in the area, I'm thrilled that we've been able to make progress.  Everyone I work with has more demand than they can handle and it's a constant balancing act to try to pull all the different trades together to keep the project going forward.

Remember our starting point?  Boob light and all!!
But thanks to a combination of begging, cajoling and using a few new contractors, we've been able to continue moving forward!


Check out the progress in the master suite.

With the drywall done, walls primed and recessed lighting in - suddenly it's a big, bright room.    I do love lighting and we've installed a lot of it - recessed in the ceiling, an art light to flood the far wall and another recessed light over the to-be-built window seat.


And the fancy chandelier will be hung just before we bring in the furniture.

I had initially planned to paint the brick fireplace flue white - but changed my mind.  The brick provides a nice warm accent to the room (and the new owners can always paint it, if they want).  So for now, we're keeping it protected under a plastic drop cloth.

And the floors!  What do you think about the new hardwood flooring?  It's yellow birch, to match the first floor.  I just love the warm tones and variation of birch flooring.

I made final color selections this week.  This blue and white Pottery Barn duvet sets the tone for the room.  We've mixed that with baltic blue drapes I made from a Nate Berkus pattern called Jatte.

Master Bedroom Feature Wall - Winter Lake

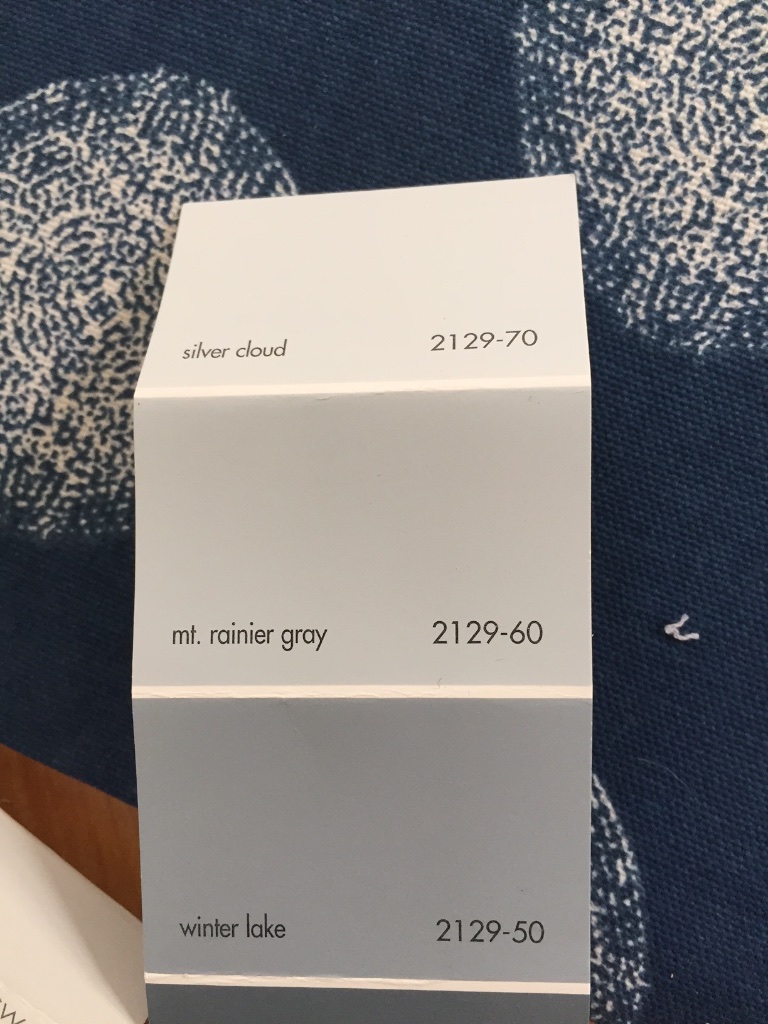
But I want a feature wall, to give the room a little drama.  The guys will be installing it this week - it includes bold chair rail and trim.  Above the chair rail will be a Benjamin Moore color called Winter Lake.  And below will be the same glossy white on the trim that we use throughout the rest of the house.

The closet is in and we'll add the wardrobes to provide lots of storage later this week.

And the master bath?  I've really put a lot in here!  It took me several days to install the intricate carrara marble floor - and I just love it!
The shower walls are a carrara subway tile and glass doors will get installed soon.


 The double vanity is a color called 'soft gray' and provides lots of storage.  It's not much to look at with the bare utility bulbs hanging out of the wall, casting weird light on it - but stay tuned,  there's more to come!  The walls will be painted a soft blue-gray, Mt Ranier Gray from Ben Moore.


These tall mirrors will go above each sink - with 3 polished nickel sconces to provide lots of light.

Still to be install are the Toto toilet, Pottery Barn towel bars, and faucets.  And then it will be ready for use! Pin It

Tuesday, October 25, 2016

Input Needed - Kitchen Design

Once again, I've used an antique door for the pantry.  This is an old one - the guess is pre 1900!  I love the big glass panels and the two wood insets below. We'll clean up the glass and add replacements where necessary.  But here's the conundrum.   I can't decide.  Should it stay in its natural state (it's a bit rough)?  Or be painted blue?  Either way, it will be a nice focal point in the kitchen.


Photo:  AJ Madison


Which brings me to the range knobs.  We're installing a Thermador gas range in this kitchen,  Thermador has an option for custom knobs, that come in their trademark blue.  I'm crazy about these knobs (they are an extra cost....I could have bought a cheap range for what they cost...but I had to have them)!!    And I'd really like to paint the door the same color.

Photo: AJ Madison


What's your vote?  Blue?  or Antique wood?

Thanks! Pin It

Tuesday, October 18, 2016

My Mother Would Be Proud.....or How to Upholster a Built in Banquette

I've been gearing up to upholster the built-in banquette for weeks.  At over 10 feet long, it's big, so it was a challenging project. And I bought the last of the fabric at the store....so if I screw it up, I'm back to the drawing board!  A bit intimidating, to say the least.

Subaru - the ultimate New England delivery vehicle!!
Kyle built the to-be-upholstered section for me a few weeks ago and brought it to my house to work on it.  I had planned to do it indoors, but it's so big the driveway made a lot more sense.

My husband thinks we provide a constant source of entertainment to the neighbors. We don't have a garage, so I frequently tackle DIY projects in the driveway. And when I'm working on a long narrow wooden box just before Halloween, well, you can see it might draw a few comments!  


So I dragged out my upholstery tools and got to work.  


First step was to apply the foam to the structure.  The 3M contact cement I used has all kinds of warnings (flammable, health, etc), I was glad I was outside!


PS - have you ever tried to cut foam rubber?  It's tricky!  But to make it easy, just pull out your old electric carving knife. (or you can get one at The Christmas Tree Shop for $7.99!)  It slices right though!


Next was to wrap it in polyester batting, to smooth the harsh edges of the foam.

And then finally, I started to add the fabric.  It's a bit tricky.  We built the banquette in sections and I needed to line up the pattern across the top and the base.  You see, my mother was an amazing seamstress.  She made lots of my clothes when I was growing up (very helpful, because I was so tall, we couldn't find anything to fit!).  And she taught me to sew as well.

One thing that she always emphasized was the need to match patterns.  She always worked hard to make sure that everything matches (and to this day, I'm sometimes shocked to see nice quality clothing, with plaids or stripes, that don't line up).  With that focus, I spent a lot of time making sure the pattern matches up.

Next steps will be to upholster the top and add the brass brads for a little extra style.  I'll do that just before installation.

And when the base was done?  Richard's first comment was 'your mother would be proud'.  Ha ha.  She would indeed.....
Pin It

Wednesday, October 12, 2016

Lighting, Lighting, Lighting

Just say 'no' to the boob light!!!
So here's the dirty little truth about lighting.  Lighting designs change every 7-10 years.  That boob light that you installed in the 90's?  Looks ridiculous now.

The Edison bulbs that we're all so crazy about (and I do love them!)?  By 2025, we'll wonder why we wanted them so much!  And nothing dates a house like out of style lighting.

So when I'm choosing lighting for a house, I try to go with something a bit classic - but with a current style.  Because whatever I pick, it will be out of style in 10 years. (Note:  original, classic lighting can be an exception to this rule....but I rarely get lucky enough to have a house full of classic lighting.  More about that later!).

For this house, I've gone a bit overboard on lighting.  Thanks to the original antique fixture in the foyer, I'm going with brass fixtures for this house.  And I quickly learned that nice brass fixtures tend to be higher priced than other finishes.


First up?  The kitchen.  I really, really wanted spherical fixture for over the island and the banquette.  I ordered these lovelies from Wayfair, but even though I like the size and shape, the finish seemed a bit cheap, so they got sent back.


That sent me into a tizzy of fixture hunting.  After weeks of online search (what else is there to do in the evening?), I settled on these Hudson Valley Coffey Pendant fixtures that I found through Wayfair.  We have HudsonValley lighting in our own house and I love it.  Very high quality and beautiful style.

For the dining room, I found this beautiful Hinkley fixture.  I love that it combines classic traditional style with a modern flair.


And for the living room, we have a high ceiling, so I went with this statement fixture from Ballard Designs.  So I did manage to get a spherical fixture!  Just not in the room I started with!

The bathrooms will also have beautiful lighting.  This Hudson River sconce will go in the hall bath.


And the powder room will sport these great sconces, with Edison bulbs (see, I do love them!).


And for the master bedroom, with its high ceilings?  I fell in love with the Pottery Barn chandelier.  It's iron, with brass elements.


But let's not forget vintage fixtures.  We found this really unusual fixture in the house.  I took it to the local Polishing Shop to clean it up.  And it didn't disappoint!  Can you believe how different it looks? Its a small fixture and will go in the vestibule, right inside the front door.  This is a fixture for the ages, after almost 90 years, it's still perfect in the house!

And there will be more, but isn't this a great start?


Pin It
Related Posts Plugin for WordPress, Blogger...