Wednesday, November 5, 2014

A Unique Entrance - Can It Be a Mudroom?

I've heard it said that most buyers decide if they want to buy a house within 5 minutes.  I'm not sure it took me that long on this house, because I fell in love with the entrance.


I'm not sure if you call it a foyer, since it's a common entrance to both apartments.  But I think it's an amazing space with a lot of potential.  It has the original bead board ceiling, clapboard siding, and beautiful doors with their original hardware.


Of course it needs a few changes!  We'll eliminate 1) the windows that are the backside of the shower units for the 1st floor bathrooms, 2) the bathroom exhaust vents that stink up the room, 3) the indoor/outdoor carpeting that's covering up original floors.

And I'd like to make it a giant mudroom, with a separate storage unit for each tenant.  So, the plan is to put a closet, mud bench, and coat rack on each side, next to their front doors.


Once the guys pulled the windows out, I started the design.  I needed to figure out dimensions for the layout.  Painters tape is great for this, because you can apply it and remove it as much as you need to - to get the right proportions.


From that, I came up with this layout.  I'm going to use IKEA units for the closets, with a 5 panel glass door.  It's a nice blend of traditional and contemporary that will look great in the space.  Waterhouse Builders will install them with a kickspace below and crown moulding above - so they will look like custom built ins.  Next to each unit is a mud bench for putting on snow boots.  The benches will have wooden furniture legs for additional support and a little additional style.  Above each bench will be two rows of coat hooks, for lots of hanging space.  And we'll use a wide plank V-groove bead board to continue that blend of contemporary and traditional.
In addition to the storage design, I'm really excited about the ceiling fixtures.  These retro style light fixtures will look great on the white bead board ceiling.  There will be two of them - one on each tenant's side.  One of the things I've learned on this project, is when you have a common area, each tenant must have their own light with dedicated switch.  Who knew?

But before any of the custom woodwork can start, we needed to tear out the old carpet and get the floors cleaned up.  Underneath, we have tired old pine floors.


The team from Peter's Hardwood cleaned them up in no time.  They sanded them and did two coats of polyurethane.  We'll do the final coat when everything else is complete.


We hope to start on the woodwork in the next couple of weeks.  But what do you think?  Doesn't it look better already?  Won't this be nice for the new tenants?

Sources:
Light Fixtures - Lamps Plus - Franklin Park Vintage Metal Cage
Closets - IKEA
Copper Clock - Smith & Hawken


Pin It

Monday, November 3, 2014

Instrastructure Part 2 - Is That the Neighbors I Hear??

Cold weather comes early in Maine (so does snow!), so it's time to get the boilers installed (reminder, a boiler is for hot water/steam, a furnace is forced hot air).   The gas company ran new gas lines to the house and we're ready to do the conversion from oil to gas.

Do you remember the old boilers - and the asbestos challenge?


Well they are long gone and Dominic has installed a new, wall mounted Rinnai boiler in each unit.  I just marvel at how small these are - about the size of a suitcase.  And they're so quiet, sometimes I have to put my hand on the unit to see if it's running!  It's a lot of work to install them - see all that copper piping?  It's all new!  But with gas as the fuel source and an efficiency rating of 95.6%, these will be much more affordable for the owners/tenants.


The other key element of making this duplex energy efficient is to insulate it well.  We had cellulose blown-in insulation installed in the attic and all new insulation installed in the knee walls.  There was already blown in cellulose in the first floor exterior walls, so now the house should be nice and snug.

The only other place that needed some attention was the basement.  We had them insulate the sills and the guys pulled the original leaky windows out (all 8 of them - a pricey project!) and installed new energy efficient units.


But I had another worry regarding insulation, that wasn't related to energy efficiency.   How can we reduce noise between the two units?  My first thought was to have the insulation guys blow in cellulose between the walls.  But when I met with Bob Ward from Builders Installed Products, he was quick to point out that would only give us a 25% improvement in sound reduction.  That's a lot of cost for only a little benefit.  So we started looking for a different option.  After some research, we discovered a couple of new products that we wanted to try.

Roxul makes a new product that they call 'Safe and Sound'.  We've used regular Roxul before - it's a fantastic product around fireplace flues, because it's fireproof.  And of course improving fire rating between the two units is important.  In fact, per building code, we need to use fire rated drywall on all party walls.  But this new insulation serves a double purpose.  And since all the kitchen and bathroom walls were opened up, it was easy to install in those spaces.

Of course we were still curious how well it worked.  But we put it to the test pretty quickly.  Mike Backman from Waterhouse builders had called me and we were trying to have a conversation while the drywall guys were installing the kitchen wall (think 3 guys simultaneously using power tools and how much noise that creates).  It was so noisy, we couldn't hear one another.  But when he went around to the other unit, you could barely hear them.  And that was with drywall only partially installed on one side!  Once everything is installed, it will be even better!
Can you hear me now?

We also installed Roxul on all the bathroom party walls.  So now the tenants won't have to hear each other gargling before bedtime!

But between the upstairs bedrooms, we weren't opening up the walls, so we had to come up with another solution.  So we tried something different, called soundboard.  It looks like compressed fibreboard.  But by installing over the old plaster walls, it creates a sound barrier between the units.  It's a good value, because we didn't need to demo the whole wall, and only need to replace the baseboard trim.  And we will top it off with fire rated drywall.

So now we're buttoned up on all the infrastructure. The drywall has started and soon it should start looking like a real house.  Yay!


Pin It

Tuesday, October 28, 2014

Bathroom Design Times Four!

As we get close to the finish line, it's time to talk about some of the fun stuff!  And we've got exciting plans for the bathrooms.  We have 4 full baths in this house, so there was a lot of planning required.

First Floor Baths

Mirror image baths....getting a big transformation!
For example, we are giving the two first floor bathrooms a total overhaul.  The tubs had so many nicks and scars on the porcelain, we decided to pull them out and replace with shiny new American Standard tubs.  Oh, and those odd windows into the foyer?  We pulled them out.  And the bathroom exhaust fan that vented into the foyer (yuck!), those have been rerouted and now vent to the outside.
Yeah, this needs an update!

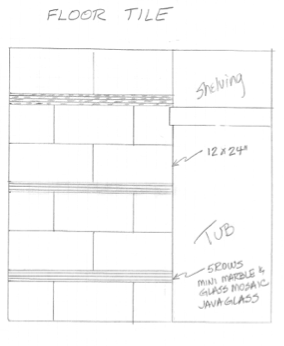
I decided to do the two bathrooms with the same tile, in large part, because I fell in love with it.  The floor tile is a large format (12" x 24") Italian ceramic, with a textured finish.  It's non-skid, which is great in a bathroom and the light color will help these small baths look larger.  For the tub/shower, we'll use a white subway and a fantastic marble border, with three different types of marble intricately  joined together.  It will provide a beautiful accent in the room.

There is never enough storage in a bathroom.  Our solution?  We'll keep the storage units that are next to the tubs and add new vanities with storage as well.

For fixtures, I wanted to add a modern classic look, so we went with these beautiful Grohe faucets in all the bathrooms.


Owners Master Bath

The footprint on the master bath hasn't changed, but by eliminating some walls and that not-so-attractive sink, it's going to look a lot different when we're done.  And the new skylight is bigger than the old one and adds lots of additional light.


We're installing this large new vanity, with a stone top.  Above it, we'll have a new custom cut mirror and Restoration Hardware Asbury sconces.


We'll coordinate that with this ceramic floor, interspersed with stripes of this stone and glass mosaic.


Tenants Master Bath

Since this bathroom is entirely new, we had a little more flexibility with the design.  We're installing the tub under the sloped ceiling.  Thankfully, there is plenty of headroom for a shower.  We'll tile the entire tub space, with white subway tile and a stone and glass mini mosaic to provide some additional interest.  At the far end of the tub, next to the knee wall, we'll build in custom shelving, to provide additional storage.

Then we'll add a new mahogany vanity and toilet.  We're using the same Grohe fixtures in this bath and will add these sconces next to the mirror.

Best of all, we're hoping to start on the bathrooms in the next few weeks!


Pin It

Tuesday, October 21, 2014

The Not-So-Sexy Stuff: Electrical and Plumbing!!

So, even as I write this post, I know a lot of people won't want to read it.  Because tearing out walls is exciting, while wiring and PVC pipe is a little less interesting.  But if you're remodelling a house, this is the really important stuff.

Case in point, not surprisingly, as soon as demo started, we found a mess of knob and tube wiring in this house.  They had replaced it in the easy to reach places (like the basement), but behind the walls and ceilings, it was still there (if you look closely, you can see the two cloth covered lines coming through the tubes and then tying into the light switch).  We want to make the electrical safe and up to code, so it had to go.


In addition, we also had every other generation of electrical wiring in the house.  Yep - BX, Romex, fuse boxes, you name it, we had it.  And it had to be changed out.  Lots of things were done wrong and we wanted to get it cleaned up.  So, the guys got going and before I knew it, the basement was full of old wires with lots of new stuff installed.


Look at all that shiny new wiring going into the electrical box!


I was a bit sad that we had to take out the old pearl button electrical switches.  But they were made for the knob and tube wiring and can't be reused.  The good news - I found reproductions at House of Antique Hardware!


After lots of hard work, we have all new wiring in place.  The drywall guys will patch it all up and it will look great.


And while all that electrical was getting done, we did a pretty major overhaul of the plumbing as well.  The kitchen plumbing was updated, to meet new building codes.  We installed new bathtubs in both first floor bathrooms.  And of course we put a whole new bathroom in the Tenant's Master Suite.  
New First Floor Bathtubs & Insulation
New Tenant's Master Bath


The Owner's Master Bath also got a major update.  The original space had lots of walls, where they really weren't necessary.  It made the space feel very cramped.  We tore them out and suddenly it felt much larger.  But we still had a challenge.  If you are a tall person, you can't see your face in the bathroom mirror.  Tough for shaving or makeup, unless you bend over the whole time!


So when we installed the new skylight, we used a larger unit and were able to extend the wall up.  Jason is 6' 7", so he checked it out for us!!!  And there will be lots of natural light when you're getting ready.  Very cool! 

Now we just need the City to come out and inspect - and we're ready to move forward!


Pin It

Thursday, October 16, 2014

Creating a Master Suite

When we bought the house, the Tenant's side had an awkward 2nd floor bedroom.  It wasn't very inviting.  In large part, because of the following:
1)  It was really dark (just one window in the whole space),
2)  Had a small closet,
3)  Included a useless hallway
4)  Had lots of of attic space, but it wasn't well utilised
5) And of course there was that mysterious hole in the ceiling

We wanted to fix that.

Demo Day!!!
So, we started (as we usually do), by knocking down walls.  By moving the knee wall back 5 feet, we suddenly gained a lot of space!  Our goal?  Add a full bath, a larger closet, a larger bedroom and lots of light.
With the walls gone, the guys could start with brand new framing.  Much easier and quicker and it allowed us to put the walls where we wanted them (note - we added a lot more structural framing below, to accommodate the weight of the new bathroom!).

Next, the skylights.  In these old houses, I think skylights are one of the best value items you can add.  They're not cheap - I use Velux which is the top of the line.  They're guaranteed for 10 years .  In fact, I've bought houses with Velux units that were 25 years old and still worked well without any leaks.  
And it's so exciting to suddenly see the roof opening and the sunlight flood in!


Love the bigger space and bright sunlight streaming in!

The difference they make in a space is amazing.  This is the upstairs stairwell, before we started.  
And this is after.  The natural light that floods the space is great!  Oh, and notice the old lath?  Well, when we jacked up the first floor to make it level, all the plaster cracked and had to be removed.
Bathroom - Before (attic space)
Next step, the bathroom is framed in, with plumbing ready to go.  The skylight in here makes it such a nice inviting space.  Wait till you see the marble & glass tile insets we're going to do in here!    And for reference, here's the attic space that was 'before'.  
And here is the rest of the space.  Nice change, don't you think?
Before
During

Before

Oh, and the hole in the ceiling?  Well, we discovered a pie tin up there that was catching drips from a badly flashed 'stink pipe' (plumbing vent).  Our roofer fixed it for us in and the pie tin is now history.

So, we didn't add a dormer or make any major structural changes - but by removing walls, reclaiming lots of unused attic space and by adding skylights - we have made it a big, bright usable space.  We need to finish electrical and plumbing and then on to drywall.  

Nice change, don't you think?


Pin It
Related Posts Plugin for WordPress, Blogger...