Wednesday, January 25, 2023

Demo Discoveries - It Should Have Been a Tear Down.....

We've heard from folks that looked at the house before us that their builder said 'tear the house down'.  We dismissed that, figuring they just wanted to start fresh.  That's so much easier than tying into an existing house.


But as we’ve gotten into this project, we've realized maybe they were right.  


This house has a LOT of problems.  Many of them we knew when we got started, but others could only be discovered as we got into the demolition phase.  There were SO MANY issues hidden behind those walls.


So let’s look at some of the challenges we’ve found.


Remember the photo of the hip dormer on the back of the house?  Well it was built properly with the structural supports going down to the basement.  


But at some point in its history, someone decided to cut them off on the first floor and cantilever the house and the weight of the back porch roof on these wimpy little 2x4’s, spaced far apart.  The 2x4’s can’t handle the load and the 2nd floor is sagging.  
 

To make it even worse, on the other end of the dormer (which happens to be in the middle of the dining room), they couldn’t cantilever the load, so they used a deck joist hanger to carry all of that weight with the floor joists above!  (Note: modern computer models show this should be a steel I-beam carrying all of this load, not a couple of 2x6's with a joist hanger!)
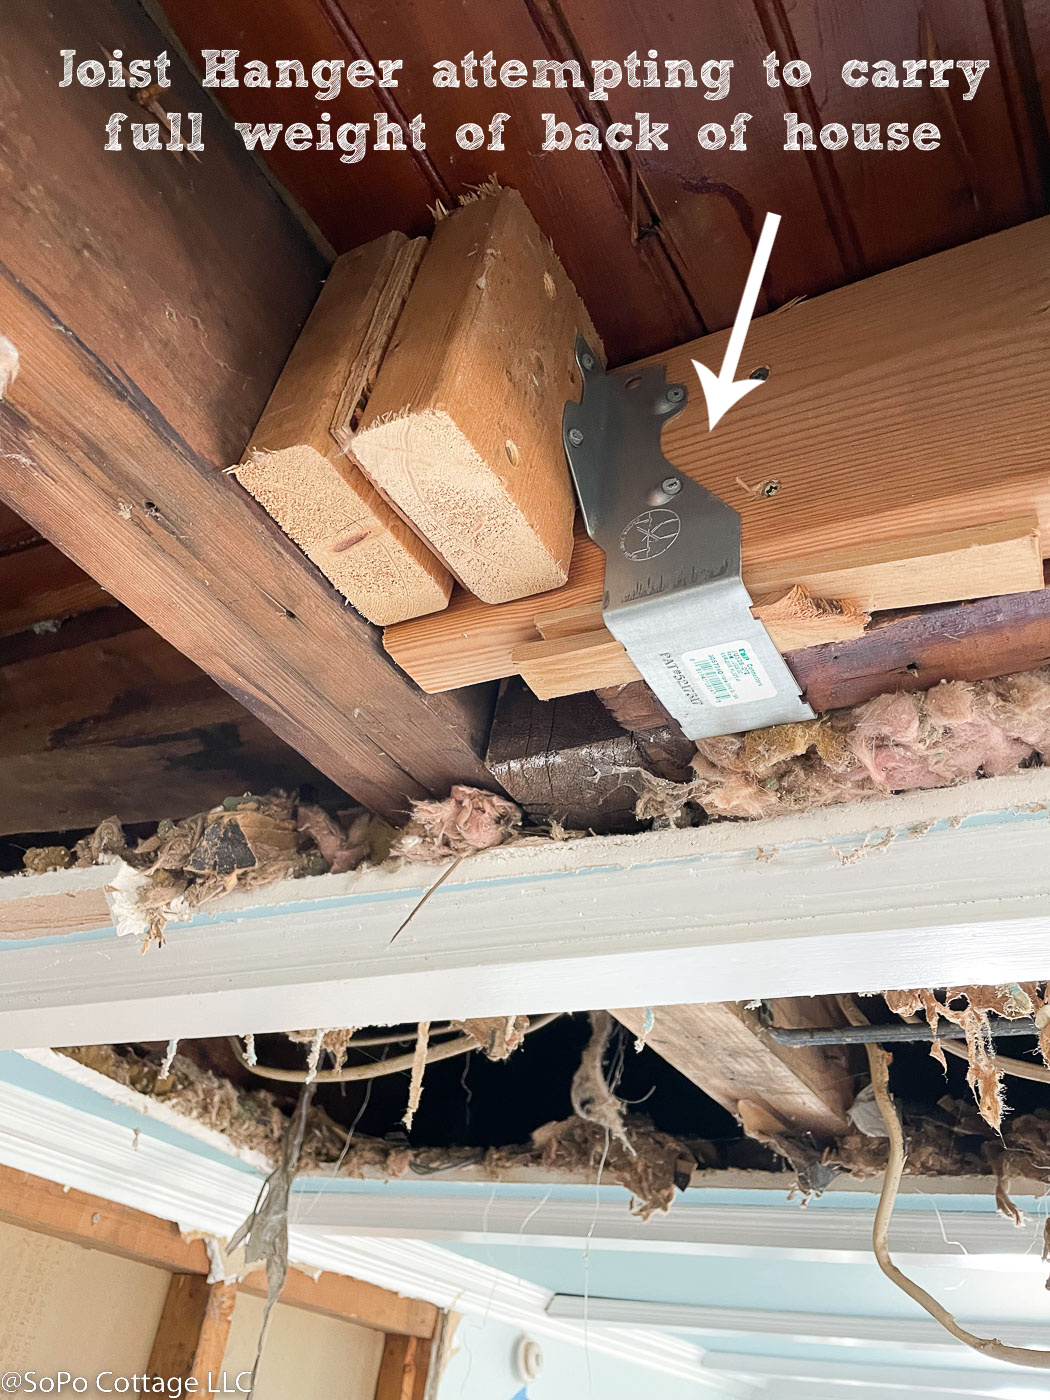

That side of the house has sunk 4 inches and makes me squeamish when it bounces walking through the room.


At this point in the exploratory demo, we realized that the entire house needed to be gutted - there were just too many weird things that had us concerned.  This was NOT part of the original plan (I originally hoped we could live in the house during the reno, silly me) and certainly wasn't part of our budget.  But it's a good thing we did, because here is what else we found:


As we gutted the kitchen, we realized someone opened up a load bearing wall and posted up all the weight with a piece of BEAD BOARD!!!  How did this not fall down???  (the new 2x6's you see were added when we realized how poorly supported this was)


The other side of the kitchen has had so much water damage over the years that the studs flake away at the lightest touch.  


And even worse, the sill (that’s the big piece of wood that holds the house on the foundation) has rotted away completely on one entire side of the house.  It smells like compost when you start digging it out. And if you push against the wall, it sways back and forth. Yikes!


Many of the windows were installed without the typical ‘King and Jack’ studs which provide a robust system to hold the windows in place.  Instead, they cobbled together 2x4’s and have created a weak hinge condition - like this back wall that is starting to jackknife.  


About once a day we say ‘How is this house standing?’


Is there more?  Oh yeah.  


Much of the house was originally a cottage and doesn’t have sheathing – the wood skin that creates the exterior and ties the studs together.  The clapboards usually get installed on top of the sheathing. Instead, on our house, the clapboards are nailed directly on the studs.  And then they nailed cedar wood shakes on top of the clapboards.  This isn't providing a watertight seal and when we get a heavy rain – some areas of the house have water running into the interior wall cavities.  So we will need to remove the cedar shakes and clapboards to sheath the house.  That means we are tearing out the interior walls and the exterior walls, so we're just going to be left with studs. It's suddenly turned into a big job.  Yikes!


The electrical system is old, but we didn’t find any signs of knob and tube wiring….until we opened up the walls....and you guessed it, we found knob and tube.  Thankfully we already planned to completely rewire the house.


The basement was full of asbestos with all the heating duct joints wrapped in asbestos tape.  

Asbestos remediation in process

But when we opened the walls, we discovered that the upstairs heat ducts are completely wrapped in asbestos.  This asbestos remediation was 2X the cost of our typical job! 


And with every rain, we've had flooding in the basement.  That probably explains how the sills have rotted out.  We need to figure out how to manage that for the future.


So what does this all mean?  Is it worth doing all the work to fix the myriad of issues?  Wouldn't it just be cheaper and easier to start over and tear it down?  


Yes, that's probably the smart thing to do.  


But my husband is quick to point out we don’t always take the smart path. 😂  Why?  Because 1) We love old houses.  And particularly this one!  2) We still think a 125 year old house can be pretty fabulous when it’s all fixed up.  A newly built home can never have the depth of character and history that this one will have. And 3) Even a major renovation is far better from a sustainability perspective than tearing a house down and building a new one.  


And as one of our neighbors said the other day - this is a gift to the neighborhood we love.  The practical thing would be to tear the house down and build something else (which could be a huge house since the lot is so big).  Instead, we will painstakingly find all the issues and fix them (even though it's a far bigger job than we first anticipated). We're up for the challenge to honor the history and character of this soon-to-be wonderful home!  Just wish us luck - we may need it!!!


Pin It

Wednesday, January 18, 2023

Old House History - 1898 to Now

This feels like my Nancy Drew moment…. I’ve been digging through photos, deeds, Homeowner's Association files and chatting with all the neighbors to try and figure out the history of the house.  It appears to have evolved from many renovations over the years.  But what was built when?  And how?  And then suddenly we got our ‘ah-ha’ moment and started to fit the puzzle of the house's history together. The key? An old photo I found in a file folder that helped us figure it all out.


Here's the photo, which I'm guessing was taken about 1910.  It's a whole lot different than the house we have today - but explains a lot of the mysteries we have found. And notice the front door is on the side of the house, which of course would face the water, rather than the street like it does today.


But first, let's go back in history a bit.  Maine has been known as Vacationland for generations and that was particularly true along coastal Maine. This area was originally known as Loveitt’s Field - a seaside pasture for grazing sheep, but it evolved around the turn of the last century into a group of summer rental cottages.  Many of the cottages were owned by the Loveitt family - they were  known for their distinct paint colors- brown with yellow trim. 


Antique Postcard of The Cloyester hotel, dated 1906

There were also a couple of big hotels and 'casinos' (these were more like a resort than the casinos we know today) in the area.  A well known inn was the Cloyester.  It attracted visitors from New England and Canada every summer.  I came across this antique postcard and marveled at how its sentiment is the same in 1906 as it is today - "the rocks, the waves and the salt air"  attract visitors from 'away' to enjoy Maine in the summer with friends and family.  


Neighborhood folklore says there were a couple of small cottages that were associated with the Cloyester - including our home.  But when I do the deed search, I find it was owned by the Loveitt family.  So whether it was a Loveitt cottage or a Cloyester cottage, we'll probably never know.  But the house certainly had humble origins.  The floor plan below shows what was probably the 1898 version of the house, which is the current kitchen (see the physical history we had done here). 

Floor Plan - 1898, the original cottage

Today there here is a crawl space below the kitchen (not a full basement).  The kitchen has beautiful narrow bead board paneling on the walls, that we haven't found anywhere else in the house.   And behind the beadboard, we have found exterior clapboards that are painted on the inside (a cottage wouldn't have been a year round home, you wouldn't have insulation and wallboard.  Instead, the interior of the clapboards would have been painted to make the interior look nice).


Our next clue is a 1906 photo that a neighbor shared, which shows a portion of the house.  Now we can see that the main house has started to take shape, but without the shed dormer across the top.  It's painted white and there aren't any windows on the original part of the house.  There also isn't a chimney, so it probably wasn't a year round house.

With that photo and the basement structure as our guide, here's our best guess of how the house was constructed before 1906.

Floor Plan - Pre-1906


This next panoramic photo is one of my favorites and was kindly shared by a neighbor (thanks to a hint from one of our readers!).  It's a big photograph, probably 22 inches wide.  It shows the Cloyester hotel in the left foreground, but up the hill to the right is a portion of our house.


In this photo, the hip dormer has been added to the back of the house and there is a chimney.  So maybe it's now used as a year round house!  

Close up from large panoramic photo

We don't have a date on the panoramic photo, but let's look at it a bit more, because it does such a wonderful job of capturing the area at that point in time.  Look at how The Cloyester Inn juts out on the rocks.  And look how few buildings there were.  Things have changed so much!

Did you see the woman down at the bottom of the cliff!  What was she doing?  She seems so surprised by the photographer.   I'm not an expert on women's fashion, but doesn't that dress seem to be late 1800's or early 1900?  (and how could she climb up and down that cliff in that dress???) We don't have any other way to date this, but it's such a fabulous photo!


And that brings us to the 'ah-ha'  photo again.  Now the house is white again (or something pale), but it has porches on 3 sides.  We always guessed there was a side and back porch.  But never knew about a front porch.  Wow! Maybe this explains why the windows are so funky on the front of the house today?  The front porch would have hidden a lot.


Here is another photo that we know was pre 1921.  The Hastings Inn (the fancy house in the foreground) was a boarding house that burned down in 1920 or 1921.  Just up the hill to the left is our house.  It's hard to tell with the historical society logo on it (this is the only version they would allow me to share), but the house still has the 3 porches (the back porch appears to be enclosed) - but now a hip dormer has been added to the front, with 3 windows (today we have 4 windows and a shed dormer!).  


From that photo, we came up with this 'guess' at the floor plan pre 1921. 

Floor Plan - Pre-1920


This aerial photo from a former neighbor that wrote a history of the neighborhood is from the early 1930's.  The front porch is still on the house.... not sure when it disappeared.   Interestingly, deeds show the house was purchased as a foreclosure in 1932.  This was during the Great Depression, so it's not surprising that it went into foreclosure.  Houses are often renovated right after someone buys them, but it's doubtful there were many changes to the house during this period, because so few people could afford updates.


In 1944, the Willard family purchased the house.  During World War II, they probably didn't make many changes to the house.  So it was probably sometime after this that the rest of the changes were made, creating the floor plan we see today.  

Floor Plan - Today

Today, we have our funky front facade with the mismatched windows.  And we have a front shed dormer instead of a hip dormer, that extends over what was originally the side porch and the long front farmers porch is long gone, replaced with a smaller porch that has Arts & Crafts styling.  


The side and rear porch have all been integrated into the main house.


In 125 years, this house has seen so many additions and changes.  And now of course, we will put our own stamp on it.  But we will be careful to maintain much of its original style and grace, because it really is a special home with lots of history.


Pin It

Wednesday, January 11, 2023

Getting Started - Asbestos Remediation


First things first - and of course safety is at the top of our list of things to fix.  Before we do anything else in the house, we want to get the asbestos removed.  The duct work has asbestos tape on every joint in the basement and we don’t want anyone working down there until it’s been remediated. 


But it’s a big job – it took almost a week for the Safe Environmental Solutions  crew to get it all out and contained.  They had to carefully wrap each joint to keep the tape contained, before removing the pipe. And much of it was in hard to reach areas in a low crawl space - not a fun job!


Special tape securely fastens the asbestos to the pipe


And as luck would have it, the ductwork upstairs was completely encased in asbestos!!  So they had to remove those as well.


As usual, the Maine Department of Environmental Protection stopped by to do a spot inspection.  But of course we had followed all the rules and were in fine shape for their inspection.


By the time they were done, we had a trailer load of asbestos waste for the landfill!  With a nice empty basement.   


Now it will be safe for all the trades to work down there – not to mention there is a LOT more space to work (there is so much ledge rock!!!  Crazy!)

Lots of open space with no asbestos!!!  (and look at those old tree trunk posts!)


Pin It

Tuesday, January 3, 2023

Storm Damage - Once in a Generation Storm

We had a great time getting away and seeing the grandkids during the holidays, but now that we're back in town, we needed to assess what the big pre-Christmas storm did to the house.

It wasn't pretty.  The awning which we always guessed helped shield the glider windows from big storms, was ripped completely off the house.  

We found it clear across the lawn! 

And without the awning, the windows (which didn't close very well) let a lot of water in.  It was dried up by the time we got back, but the water stains were clearly visible on the floor.  I haven't gotten up the nerve to rip up the floor protection to see how the wood floors fared.  I'm hoping the floor protection did its job!


One of the back doors was blown in from the storm.  This is an oversize door and was already a bit fragile - so it was no match to the 70 mph winds.  But it was a bit of a shock to see it torn apart.


The basement flooded - but we've had that happen with all the big storms, so that wasn't particularly unusual.


And we lost some shingles from the vestibule roof.  That needs some immediate attention!


All in all, compared with some damage we've seen in the area we got off pretty lucky.  We'll just add this to our list of things to be fixed during the renovation!  And hope that it really is another generation that faces the next storm like this one!


Pin It

Wednesday, December 14, 2022

1898 House - The Floor Plan

Now that you've seen the exterior, here is the interior floor plan.  As I mentioned in my previous post, the basic layout of the house isn't changing much.  But because of all the structural issues we've found, we're going to be gutting a lot more of the house than we had originally planned.  And you know what happens when you open up walls - you find hidden surprises.  So until we know what those are, here is the renovation plan.


What's changed?  Well a lot.... and not so much.  The layout is very similar to the original plan.  But we are taking out walls in the kitchen (shocking I know!) to make it seem much larger.  We will also be opening up the kitchen ceilings, to get a big cathedral ceiling throughout the space. (want to see the original floor plan?  Click here)


We have agonized over the size of the mudroom and the location of the laundry.  And after lots of discussion about the mudroom, we've finally agreed to just figure it out when we start framing that space.  


For the laundry, we really wanted it up on the 2nd floor, but every option we tried had a compromise involved and we finally gave up.  If it has to be on the first floor, we had a couple of options (you guessed it - hubby and I can't agree 😂)  So we let our plumber made the decision, based on where we can access water supply and drains.  It will go in the current first floor bathroom.  Not our preferred location, but we can live with it.  And that's what always happens when you renovate an old house.  You can't always have exactly what you want due to all kinds of structural, code and financial limitations.  So you learn to adapt!


The bathroom used to have two doors - one into the office and one into the kitchen.  We will eliminate the door to the kitchen, which gives us more space for kitchen cabinets and makes bathroom layout a bit simpler.


The other big changes include fixing all of the structural issues, padding out the walls to give us more space for insulation and  updating finishes. 


The second floor gets bigger changes.  With the addition of the new shed dormer, we gain about 8 feet of space across the back of the house.  It's not an enormous amount of room, but it gives us some additional space to let us 1) create a bunk room for the grandkids and 2) create a primary suite with bathroom and 3) add an extra bedroom.  Having a second bathroom upstairs was a huge 'must have' for us, so we're glad we could make that happen.


Now that the leaves are off the trees, we're really starting to appreciate the water views.  The front right bedroom will have a glimpse of the Portland Head Light - which is a pretty sweet view no matter what the season. (if the kids all come to visit at once, it will be interesting to see who gets the best guest room! 😂)


The Primary Suite has views of Casco Bay, Cushing  and Peaks Island.  We're looking forward to seeing that view as the sun comes up in the morning!


Of course we're dying to get started!  All the permits applications are in and we're hoping to move forward soon.  


Pin It

Wednesday, December 7, 2022

First Peeks of the Renovation Plan


When we were looking for a new home, we had a set of criteria.
  And while this home met many of them, there were some things that have evolved as we’ve gotten to know the house a bit better.  So here is our latest list.
  •       ~2500 square feet
  • Maintain 'old house' style and charm
  • Open-ish floor plan for entertaining 
  •  Bunkroom for the grandkids
  • Future bedroom on the first floor to age in place
  • Mudroom for all the coats/boots/hats/etc
  • 2nd floor laundry

So let’s go through a few of the key goals, starting with the size of the home.  We don’t want another giant house.  Something around 2,500 square feet will be perfect and since this house is 2,480, it seems like just the right fit. 


A key to this design - a lot of things stay the same.  There isn't any change to the footprint of the house.  And we aren't making many changes to the layout of the house.  All of the rooms stay in their current configuration.  Where we are making changes, it's to correct structural issues that we've found and add a bit of space upstairs for a bunk room and bathroom.


Here's a first look at the exterior.  We're working hard to maintain the 'old house' look on the front facade, but will try and align the windows a bit more.  (Before everyone comments - yes, it would be nice to have another window next to the front porch for symmetry, but that would put it right in the stairwell.  That is a big no-no for building code - and I don't want a fake window that was built behind a wall), To help balance the front elevation, I'm thinking it's a great place to put a trellis with some sort of a climbing vine. I found a nice trellis behind the garage, it was too rotted to reuse, but I saved the brackets from it to create copies for a new one.


On the garage side, we've kept my favorite exterior view with the little vestibule that steps up to the taller kitchen roof.  Seriously, I love this view of the house!  


But if you step back from the door and look at the new design, you also get a first peek of the new shed dormer on the back.  

We will tear off the structurally compromised hip dormer that's currently on the back of the house and replace it with a shed dormer - which is a better match to the front facade.  The hip dormer just looked odd and didn't match anything else on the house.


Best of all, the new dormer will extend to the back of the foundation so all of the building load will be transferred to the foundation - instead of the middle of the dining room!  A win-win from a structural engineering perspective!

Bunkroom at last home
The new shed dormer will give us some additional living area across the back of the 2nd floor.  This will give us bedroom space for when the family comes to visit.  The bunkroom for the grandkids was a huge plus in our previous home (and we only had 3 grandchildren then – with the twins we have 5)  That's a lot of bunks!  And it works well for grownups in a pinch!


It also give us space for two bathrooms on the 2nd floor - a must have for us!


The right side of the house will have lots of windows like we have today, but they will all match, instead of a mixture of styles that we have today.  We will also add a sliding glass door to give us access to the deck that we're planning to build there.
We're pretty pleased with this approach.  It maintains the original character of the house, while providing a bit more bedroom/bath space on the 2nd floor.  And best of all, it fixes a lot of the challenging structural issues that we found when we started opening up a few areas of the house.  

Stay tuned, We're still making a couple of tweaks to the floorplan, but I'll share that soon! 


I

Pin It
Related Posts Plugin for WordPress, Blogger...