Thursday, August 27, 2020

Big Milestones - Inspections, Insulation and White New Walls!

People usually aren't that interested in the stuff behind the walls ..... but it's probably the most important element for the future homeowner.  The non-pretty, un-sexy stuff is what makes a house safe and energy efficient.  And we've done a LOT of behind the walls work.

All new light switches - exciting stuff!!πŸ˜†
As previously mentioned, we ended up rewiring the entire house.  With no grounded outlets, it really wasn't safe for today's lifestyle and we found some safety issues as we opened up the walls.  Now, with all new wiring, we have multiple outlets in each room as well as connections for cable and CAT/5. #WFH - indeed!!  And do you want hard wired smoke detectors?  Well we have 6 of them!
Look at that nice, tidy new electrical wiring and smoke detector!

The plumbing was also updated.  With a new bathroom, kitchen and laundry room, it was a lot of work!  But now we're in good shape.

The new Laundry Room plumbing (including a sink) is installed
The city came out, we passed our inspection and we were ready to move forward with insulation.  With our cold climate, insulation is a critical part of the behind the walls work.

And this was a tricky house to insulate.  For the new cathedral ceiling as well as the mudroom, laundry room, master bath and part of the kitchen, we used closed cell spray foam.  With the highest R value of any product on the market, this makes sure the house will stay warm during our long winter.  As the guys spray it, it rapidly expands and heats up to 114 degrees fahrenheit as it cures.  It gets so hot, they have to do one coat, let it cure overnight and then add the second coat.  Once all the curing is complete, it becomes a structural, super insulated shell around the building.


Spray foam ceiling provides the highest R value in a small space

We also used spray foam for the basement walls that didn't have any insulation when we started.  The spray foam included the rim joist around the house.  This creates a fantastic seal to keep cold air from entering the house around the perimeter. (we did the rim joist in our own house and saw an immediate 10% reduction in heating bills!)

And finally, the guys had to wriggle on their bellies to apply spray foam around the perimeter of the crawl space.  This space hadn't seen the light of day since it was built decades ago, but now it's sealed and insulated for the new owners.  That's particularly important since the bathroom and laundry room are over this space!

For the walls, we used high density fiberglass and the attic of the original house will be filled with cellulose to achieve an R-49.  This house is ready for winter!!  

But we also considered the livability of the house.   The master bedroom is next to the kitchen, a noisy spot in any house.  So we lined those walls with a product called rock wool - it's a great insulator that also absorbs noise.  With that in place, it's great if you want to take a nap!
The greenish/yellow insulation is soundproofing for the master bedroom

With the insulation in place, we passed yet another city inspection.  Woo hoo - now we can start drywall.  It's so fascinating the watch the huge sheets of drywall get delivered (and a bit nail biting as well!).

The guys got to work and installed everything in a few days.
Then started the painstaking taping and mudding stage.  But with that complete, it's really starting to look like a real house!  

  
After a quick coat of primer - it's really looking like a house!  Here's a sneak peek.  The foyer/mudroom has tall ceilings as you walk through the front door.

The main living area is bright and open


The future kitchen is truly the center of the home.  And with the new skylight we added, it's nice and bright all day long.
The basement looks so much different now!  I love drywall ceilings in a basement, with recessed lighting.  It makes a basement feel like more sophisticated living space πŸ˜€
And look at this huge room.  How would you use this large basement space?
Next step is installing the floor, then we can start all of the trim work and kitchen!  That's when it really gets fun!  Stay tuned for more updates.


Pin It

Wednesday, August 19, 2020

The Doors of SoPo Cottage

I recently had a reader ask me if I have a favorite color for painting a front door.  I was embarrassed to admit I'd never given it any thought.  But it inspired me to go back and take a look.
The Doors of SoPo Cottage

Do you see a theme?!! πŸ˜‚. I obviously love blue!  It works well with white houses and cream houses.  But it was fun to see some goldenrod doors and a couple of red and black ones as well.  And the green door is still one of my favorites.

We've reached the point on the new project that I need to pick a door color. So I guess it won't come as a surprise that I'm thinking about blue!  I have several samples that I've tried.  Do you have a favorite? (BTW - this is a temporary door, the new one with glass is safely stored away until all the trades are finished).  I might go ahead and paint the temporary door the winner shade of blue, so we can really try it out while we wait for the house to be finished!

Pin It

Wednesday, August 12, 2020

Let Me Tell You 'Bout the Birds and the Bees and the Wasps and the Ants......

Maybe it's because this house is right next to a Nature Preserve, but we've had more critters than usual on this project!  And that always adds a bit of excitement to the task at hand. πŸ˜„
It started early this spring when a bird decided to build a nest in the awning over the deck.  It was fun to watch her get to work and then swoop back and forth every day to feed her babies. It also meant we had to delay residing the back of the house until the family flew away!
And then when we did start residing the house, we discovered a wasp nest during demolition of the old siding.  Thankfully no one was allergic to stings, but they got stung pretty badly!

Back of wasp nest
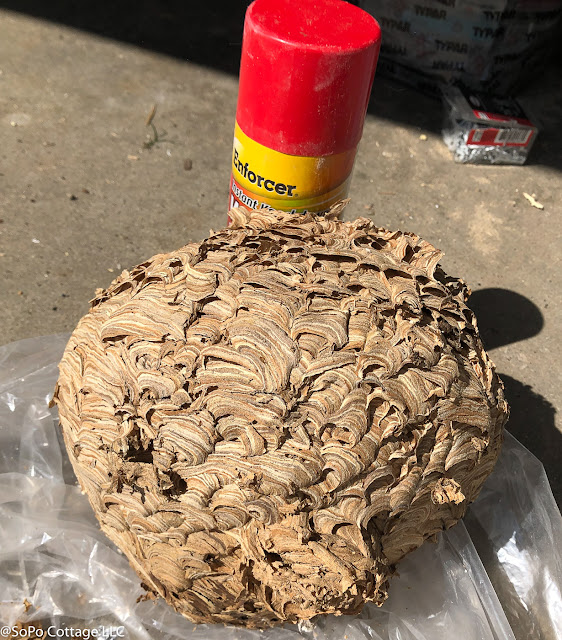
This week we had the spray insulation team at the house, getting closed cell foam in all the nooks and crannies to keep the house warm in the winter.  A key area for energy efficiency is a crawl space.  Can you imagine wriggling through a dark, short space and then suddenly coming face to face with this giant wasp nest???  There might have been screaming!!  πŸ˜‚πŸ˜‚πŸ˜‚ This thing is huge!!
Giant Wasp Nest


Thankfully it isn't still active and they pulled it out in one piece.  It really is a marvel of wasp engineering.  It's paper thin with these beautiful stripes of color.  On the backside where it was attached to the wall, you can see the rows of combs.  The guy who found it took it home to his dad as a gift - his father is an exterminator and he knew he'd love to have it as a conversation piece.


The other key area for insulation is the sills at the top of the basement walls.  (When we added spray foam insulation to that area in our own house, we saw a 10% reduction in our heating bills.  So it's something I like to do on all of our projects.)  I got a panicked phone call from the installer that hundreds of ants were pouring out of the wall as he got started.  I rushed over and found he was being a bit dramatic - but yes there were carpenter ants in one bay of the sill.  Two weeks before, I had turned on the backyard faucet, only to discover it had burst during the winter and that section of wall got wet for a few minutes.  Carpenter ants love wet wood and they had quickly moved in.  Thankfully we discovered them right away and have eradicated them before they could do any damage.  Whew!!  But again, it was a bit more excitement than we bargained for!
There weren't hundreds of ants..... but there were a few that we quickly eradicated

And who knows what we will find next?  Murder hornets?  Ha ha - it feels like a bit of an adventure every day! Pin It

Tuesday, August 4, 2020

Choosing Light Fixtures - Rules and Helpful Hints

I get questions about this all the time, so thought it might be helpful to share a couple of useful tips for choosing the right light fixture for your home.  Whether you're buying online or in a store (where the tall ceilings can make the fixture seem much smaller than when you get it home!) there are some simple guidelines that can make it easier.  But like anything else, there are exceptions to the rules.

Let's say you're looking for a dining room fixture.  To determine the diameter of the fixture you need, you simply add the length and width of the room in feet - and that gives you the inches for the fixture.

So for example, if your dining room is 12' x 10', you would add 12 + 10 = 22.  So you would look for a fixture approximately 22" in diameter.  This might seem a bit simplistic, but it works surprisingly well.
But there are exceptions.  Let's say you have a dining room like the one in our new project that has a cathedral ceiling - and it's also in a large open floor plan.  In that case, you may want to go with something a bit larger.

In a case like this, I love to do a mock-up of the size fixture I have in mind.  These paper globes are a great way to get a visual representation of the fixture.  I found inexpensive ones at Christmas Tree Shop in multiple sizes and use them as mock ups.

I did the same for the island.   Usually I use 3 light fixtures over an island.  However this time I decided two slightly larger fixtures would work better - but I wanted to do a mock up.  A couple of different sized paper globes let me see which fixtures would work (Answer - smaller and I ordered them.  I can't tell you how much I love these lights!!).

In our own kitchen, I made a mock-up of a sputnik fixture, using a styrofoam ball and paint sticks. My husband and I had a hard time agreeing on something we both liked - but putting this up gave us a way to come to agreement (BTW - this is much larger than what was recommended by the length x width calculation, but because the ceiling is very tall and the fixture is so open, it worked just fine).
Sputnik fixture in completed dining room
And what height do you hang the light?  Well most dining room tables are 30" tall.  In general, I like the bottom of the fixture to be 30-36" above the dining table, so you have room for a centerpiece and so the light fixture doesn't obstruct your view as you've sitting at the table.  But as with any other rule, you should  have your electrician hold the light up and look at it from multiple angles before you do final installation.

Ultimately, these are just guidelines.  Every room has its own special features and you should consider them as you purchase your new light fixture.  Good luck!


Pin It

Wednesday, July 29, 2020

Curb Appeal Sneak Peek

I can't resist showing you a sneak peek of the exterior changes at the ranch.  It will take awhile to get it finished, but it's starting to look like a different house!! (full disclosure, there's a dumpster in front of the house, so getting good photo angles is impossible - but you'll get the idea!).

And as a reminder, here's our plan.

First, the guys built our false gable above the new front entrance.  With the old front door removed, this starts to give that part of the house some character.


Of course we had to add a new front door!!  It has lots of glass to keep the mudroom/foyer nice and bright.  We trimmed it out to give it a bit of New England charm.

And the main body of the house got some updates as well.  We removed the old front door and installed a new double window for the master bedroom (and it makes the bedroom so bright and cheerful!).

The siding for the front and side is vinyl - but it has an amazingly realistic look of cedar shingles.  We had a delivery today and the delivery guy didn't believe us until he went up and touched it.

The roofers are coming soon and once that's done, we can finish up the rest of the siding on the front facade.  But isn't it looking great???


What else?  Well it's not curb appeal, but the back of the house is getting some updates as well. (is it rear appeal???)  We added a couple of new windows that are bringing a lot more light into the kitchen and dining room.

Rear Elevation - Before
And we had hoped to do a deck refresh, by just updating the decking.  But we discovered that several of the original joists were broken (how does that happen???) and the footings weren't properly aligned.  So rather than do a lot of piecemeal repairs, we just tore it down and are starting new.
What do you think?  Quite a difference already!  And just wait till we get it done!

Pin It

Wednesday, July 22, 2020

What About the Basement???

I haven't mentioned the basement in awhile and it really has come a long way!!  A lot of this is behind the wall stuff, but it's so important for the future of the house.

And there is so much living space down there, it really deserves some attention.  This is a dry basement, which is a bit unusual in this area.  We have had some major storms recently and haven't seen a drop of water down there.  And as we have peeled back the walls, all of the studs are completely dry.  Such a nice surprise!

Just getting all the stuff out of there has made the basement look better!  And we gutted the space, which made a huge difference in the way it looked - and smelled!! The paneling and pressed board ceiling held a lot of nicotine odors!

We will have two big living areas.  The first was the original owner's office.  After clearing the space we gutted it and were able to take the dropped ceiling out.  That suddenly makes it feels so much bigger and brighter (BTW - we will be installing new, slightly larger windows which will help bring in a bit more natural daylight).

The second living area is a mirror of the big room above.  The congested workroom is gone and now it's just a big bonus room that can be used any way the new owners want.

But the biggest change was creating a doorway between the two living areas.  I hated that you had to walk through the utility room to get between the two rooms.    So we needed to cut a doorway through the concrete foundation,  It was a HUGE job!  Dave started by cutting through on one side and then started cutting the rest from the back side. He had to keep water flowing the entire time to cool the saw blade and reduce dust (aka - it was a very messy process).
And then we got to watch him knock out the concrete.  So fun!!!  He had found a huge piece of styrofoam on the beach over the weekend and that turned out to be the perfect way to bounce the giant slab of concrete as it fell.  Watch the short video clip below - it's pretty fun!  And I know, concrete and bounce aren't usually used in the same sentence, but as you'll see, that's what happened!
Don't you love how the two rooms connect now???


Interestingly, houses during this era didn't have footings.  Instead, the basement walls were built in a semi pyramidal shape, to make them much thicker at the bottom.  That gave them the stability they needed. And see the giant aggregate they mixed in?  So different from today!


We are installing lots and lots of recessed lighting, so the rooms will be nice and bright.  And with fresh new drywall, it will feel like a true finished space.  We'll also do LVT (luxury vinyl tile) on the floors.  It's a great new product for basements, because it's extremely durable and won't ever rot or create odor issues like some other flooring materials.  And it really does look like wood!   We used it in a project a few years ago (and in our own basement) and are really happy with it.
Luxury Vinyl Tile in basement of a previous SoPo Cottage project
An added bonus was discovering this giant beam that holds up the floor joists.  We're going to expose it, which will give the room a bit more character!  


What else has happened?  Well, the old boiler is history.  But there was still a big challenge - because the boiler died in February, we had a half full tank of oil that we needed to get rid of.  That's an environmental problem and takes specialized skills to remove properly.  Clean Harbors came and removed the oil tank and had it properly sanitized before disposal (and yes, I think the truck was bigger than the house!!)
How do you get rid of a 1/2 tank of oil?  A GIANT truck!!
And we had even more big equipment on site (seriously, I think the neighbors find this pretty entertaining!!). We've had a gas line run to the house and will soon install a super high efficiency boiler. 

Another big job is updating all of the electrical wiring.  Farewell ungrounded wiring, hello 21st century!  Now you'll be able to plug in a 3 prong outlet.  And we're installing all the low voltage cable/CAT5 you could need! 

We have a whole lot more work ahead of us, but can you start to see a glimmer of nice living space?
Pin It
Related Posts Plugin for WordPress, Blogger...